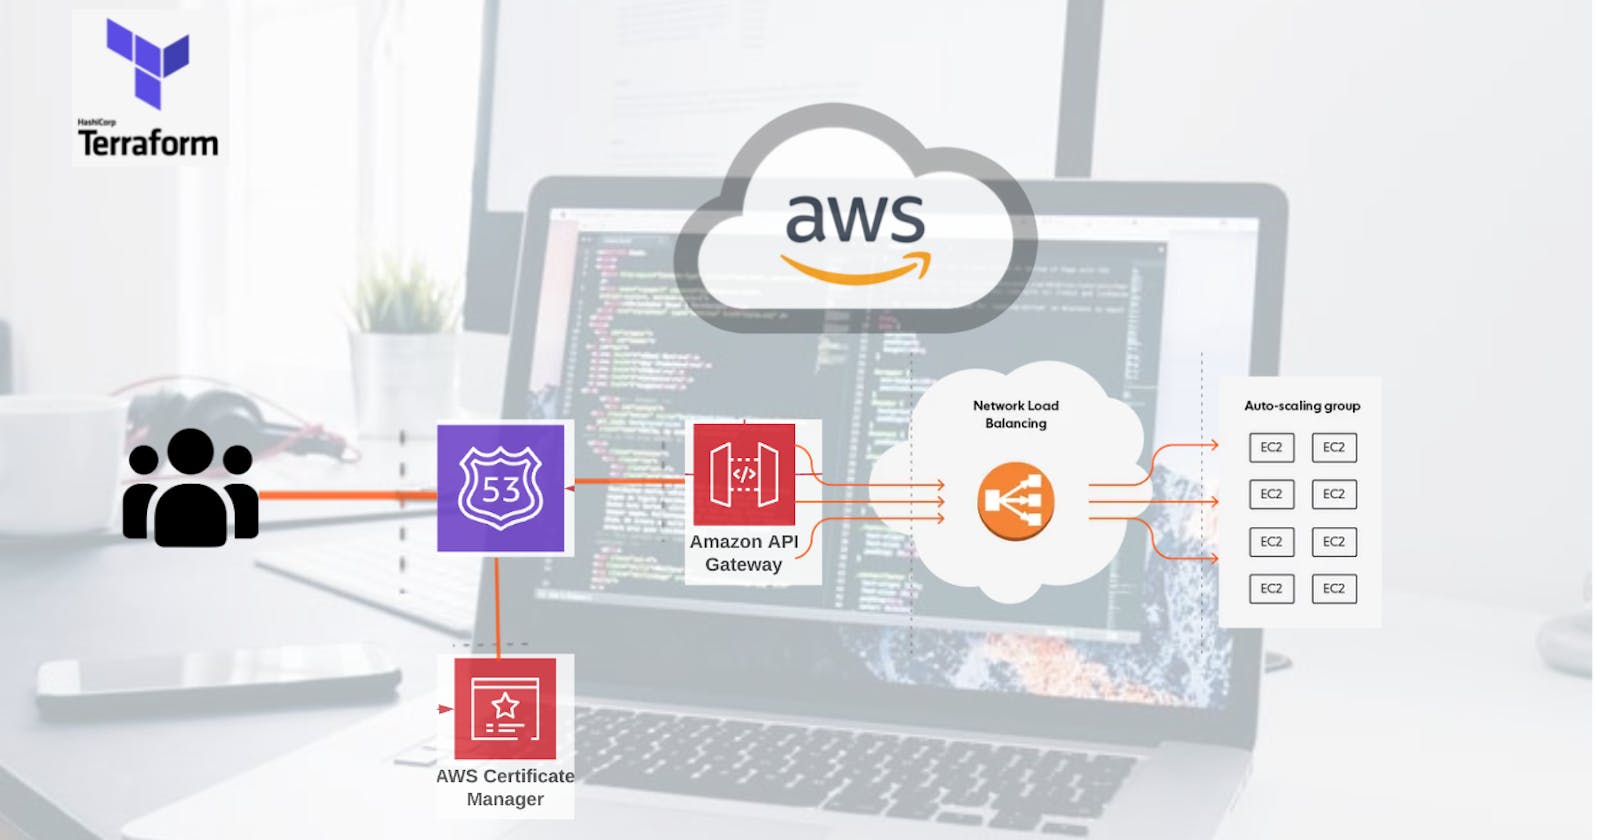


Hello readers, in today's article we are going to integrate AWS EC2 instance from an Auto-Scaling Group and Network Load Balancer (private) to an API Gateway through Terraform.
There are two ways to integrate API Gateway to EC2 Either by Maping single endpoin to EC2 or by using Proxy mode as we will be going for.
We will divide our work in 2 stages;
- Generate an AMI with our nodejs app
- Create different component to deliver our app endpoint to a custom domain.
Let get started In other to generate an AMI, let first launch an Ubuntu instance and Install Express App on it. Go to your console and start an Ubuntu instance.
Install Expres App on Ubuntu
Secure private key.
sudo chmod 600 ~/Downloads/devops.pem
SSH to the Ubuntu.
ssh -i ~/Downloads/devops.pem ubuntu@<ip>
Update package list.
sudo apt update
Install NodeJS and npm package manager.
sudo apt -y install nodejs npm
Clone GitHub repo.
cd /opt
sudo git clone https://github.com/kevAnto/terraform-API-Gateway--EC2-Integration.git
Update owner on the folder.
sudo chown -R ubuntu:ubuntu /opt/terraform-API-Gateway--EC2-Integration/
Install dependencies.
cd tutorials/terraform-API-Gateway--EC2-Integration/my-app/
npm ci
Create systemd file.
sudo vim /etc/systemd/system/my-app.service
/etc/systemd/system/my-app.service
[Unit]
Description=My App

[Service]
Type=simple
ExecStart=/usr/bin/node /opt/terraform-API-Gateway--EC2-Integration/my-app/app.js
WorkingDirectory=/opt/tutorials/terraform-API-Gateway--EC2-Integration/my-app/

User=nobody
Group=nogroup

# Environment variables:
Environment=NODE_ENV=production

# Allow many incoming connections
LimitNOFILE=infinity

# Allow core dumps for debugging
LimitCORE=infinity

StandardInput=null
StandardOutput=syslog
StandardError=syslog
SyslogIdentifier=my-app

# Restart service after 10 seconds if node service crashes
Restart=always
RestartSec=10

[Install]
WantedBy=multi-user.target
Enable the service.
sudo systemctl enable my-app.service
Start the service.
sudo systemctl start my-app.service
Check status of the service.
sudo systemctl status my-app.service
Check log for errors.
journalctl -u my-app -f --no-pager
Test the EC2 endpoint
curl -i http://ubuntu@<ip>:8080/health
And the result will be as follow
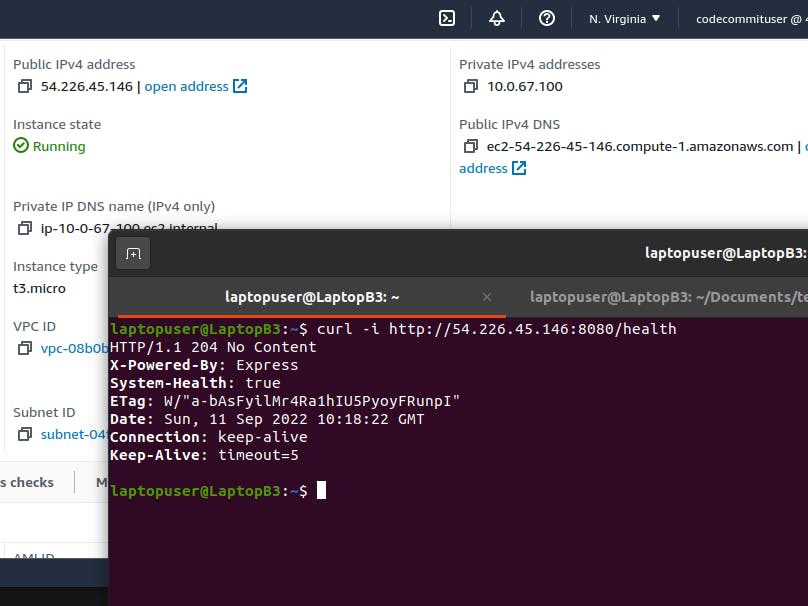
Once this endpoint is operational then make a snapshot of the instance for further use for the image and now we can dive into terraform and set our infrastructure so as to use the image id to launch template

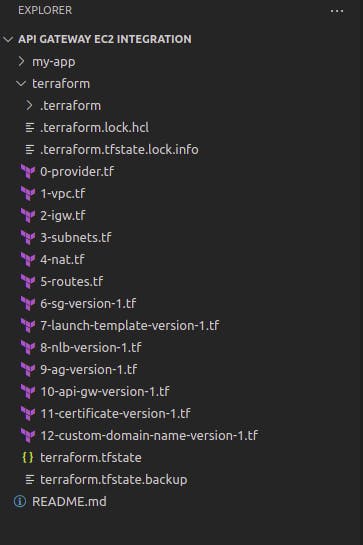
folder directory should look like this
Create AWS VPC using Terraform
Let's start with terraform. First, we need to create an AWS provider. It allows to interact with the many resources supported by AWS, such as VPC, EC2, API Gateway and many others
Create AWS provider and give it a name terraform/0-provider.tf.
provider "aws" {
  region = "us-east-1"
}

terraform {
  required_providers {
    aws = {
      source  = "hashicorp/aws"
      version = "~> 4.23.0"
    }
  }

  required_version = "~> 1.0"
}
The next step is to create a virtual private cloud in AWS using the aws_vpc resource. There is one required field that you need to provide, which is the size of your network. 10.0.0.0/16 will give you approximately 65 thousand IP addresses. For your convenience, you can also give it a tag, for example, main. Let's name it terraform/1-vpc.tf.
resource "aws_vpc" "main" {
  cidr_block = "10.0.0.0/16"

  enable_dns_support   = true
  enable_dns_hostnames = true

  tags = {
    Name = "main"
  }
}
Create Internet Gateway AWS using Terraform To provide internet access for your services, we need to have an internet gateway in our VPC. You need to attach it to the VPC that we just created. It will be used as a default route in public subnets. Give it a name terraform/2-igw.tf.
resource "aws_internet_gateway" "igw" {
  vpc_id = aws_vpc.main.id

  tags = {
    Name = "igw"
  }
}
Create private and public subnets in AWS using Terraform Now, we need to create four subnets. To meet NLB requirements, we need to have two public and two private subnets in different availability zones. File name is terraform/3-subnets.tf
resource "aws_subnet" "private-us-east-1a" {
  vpc_id            = aws_vpc.main.id
  cidr_block        = "10.0.0.0/19"
  availability_zone = "us-east-1a"

  tags = {
    "Name" = "private-us-east-1a"
  }
}

resource "aws_subnet" "private-us-east-1b" {
  vpc_id            = aws_vpc.main.id
  cidr_block        = "10.0.32.0/19"
  availability_zone = "us-east-1b"

  tags = {
    "Name" = "private-us-east-1b"
  }
}

resource "aws_subnet" "public-us-east-1a" {
  vpc_id                  = aws_vpc.main.id
  cidr_block              = "10.0.64.0/19"
  availability_zone       = "us-east-1a"
  map_public_ip_on_launch = true

  tags = {
    "Name" = "public-us-east-1a"
  }
}

resource "aws_subnet" "public-us-east-1b" {
  vpc_id                  = aws_vpc.main.id
  cidr_block              = "10.0.96.0/19"
  availability_zone       = "us-east-1b"
  map_public_ip_on_launch = true

  tags = {
    "Name" = "public-us-east-1b"
  }
}
Create NAT Gateway in AWS using Terraform It's time to create a NAT gateway. It is used in private subnets to allow services to connect to the internet. For NAT, we need to allocate public IP address first. Then we can use it in the aws_nat_gateway resource. The important part here, you need to place it in the public subnet. That subnet must have an internet gateway as a default route. Give it a name terraform/4-nat.tf.
resource "aws_eip" "nat" {
  vpc = true

  tags = {
    Name = "nat"
  }
}

resource "aws_nat_gateway" "nat" {
  allocation_id = aws_eip.nat.id
  subnet_id     = aws_subnet.public-us-east-1a.id

  tags = {
    Name = "nat"
  }

  depends_on = [aws_internet_gateway.igw]
}
By now, we have created subnets, internet gateway, and nat gateway. It's time to create routing tables and associate subnets with them. File name is terraform/5-routes.tf.
resource "aws_route_table" "private" {
  vpc_id = aws_vpc.main.id

  route {
    cidr_block     = "0.0.0.0/0"
    nat_gateway_id = aws_nat_gateway.nat.id
  }

  tags = {
    Name = "private"
  }
}

resource "aws_route_table" "public" {
  vpc_id = aws_vpc.main.id

  route {
    cidr_block = "0.0.0.0/0"
    gateway_id = aws_internet_gateway.igw.id
  }

  tags = {
    Name = "public"
  }
}

resource "aws_route_table_association" "private-us-east-1a" {
  subnet_id      = aws_subnet.private-us-east-1a.id
  route_table_id = aws_route_table.private.id
}

resource "aws_route_table_association" "private-us-east-1b" {
  subnet_id      = aws_subnet.private-us-east-1b.id
  route_table_id = aws_route_table.private.id
}

resource "aws_route_table_association" "public-us-east-1a" {
  subnet_id      = aws_subnet.public-us-east-1a.id
  route_table_id = aws_route_table.public.id
}

resource "aws_route_table_association" "public-us-east-1b" {
  subnet_id      = aws_subnet.public-us-east-1b.id
  route_table_id = aws_route_table.public.id
}
Now let set roles that instance will be using being started by launch template. Since we will be using AMI that have everything necessary for our app to work, no need to open port 20 for SSH. File name is terraform/6-sg-version-1
6-sg-version-1
resource "aws_security_group" "my-app-version-1" {
  name        = "my-app-version-1"
  description = "Allow API Access"
  vpc_id      = aws_vpc.main.id

  ingress {
    description = "Allow Health Checks"
    from_port   = 8080
    to_port     = 8080
    protocol    = "tcp"
    cidr_blocks = [aws_vpc.main.cidr_block]
  }

  egress {
    from_port   = 0
    to_port     = 0
    protocol    = "-1"
    cidr_blocks = ["0.0.0.0/0"]
  }
}
For Auto-scaling group we can either use launch configuration or launch template. In this step we use launch template because it is highly recommended by AWS. So we will launch our template from our previously created AMI and attach to it an our vpc security group. File name is terraform/7-launch-template-version-1.tf
7-launch-template-version-1.tf
resource "aws_launch_template" "my-app-version-1" {
  name                   = "my-app-version-1"
  image_id               = "ami-0c43ca940963ca00d"
  key_name               = "devops"
  vpc_security_group_ids = [aws_security_group.my-app-version-1.id]
}
Next we need a target group and it will bind to Auto-scaling group so as to retrieve instance type information and start from launch template. for health check let use a plane tcp protocol. Now let specify private subnet for our network load balancer. File name is terraform/8-nlb-version-1.tf
resource "aws_lb_target_group" "my-app-version-1" {
  name     = "my-app-version-1"
  port     = 8080
  protocol = "TCP"
  vpc_id   = aws_vpc.main.id

  health_check {
    enabled  = true
    protocol = "TCP"
  }
}

resource "aws_lb" "my-app-version-1" {
  name               = "my-app-version-1"
  internal           = true
  load_balancer_type = "network"

  subnets = [
    aws_subnet.private-us-east-1a.id,
    aws_subnet.private-us-east-1b.id
  ]
}

resource "aws_lb_listener" "my-app-version-1" {
  load_balancer_arn = aws_lb.my-app-version-1.arn
  port              = "8080"
  protocol          = "TCP"

  default_action {
    type             = "forward"
    target_group_arn = aws_lb_target_group.my-app-version-1.arn
  }
}
Next, Auto Scaling Group here we will select our launch template, specify the instance characteristics and track cpu for scale depending on it percentage here it's set to 25 and the max of instance that can be created if above 25% of cpu utilisation is 3. File name is terraform/9-ag-version-1.tf
resource "aws_autoscaling_group" "my-app-version-1" {
  name     = "my-app-version-1"
  min_size = 1
  max_size = 3

  health_check_type   = "EC2"
  vpc_zone_identifier = [aws_subnet.private-us-east-1a.id, aws_subnet.private-us-east-1b.id]
  target_group_arns   = [aws_lb_target_group.my-app-version-1.arn]

  mixed_instances_policy {
    launch_template {
      launch_template_specification {
        launch_template_id = aws_launch_template.my-app-version-1.id
      }
      override {
        instance_type = "t3.micro"
      }
    }
  }
}

resource "aws_autoscaling_policy" "my-app-version-1" {
  name                   = "my-app-version-1"
  policy_type            = "TargetTrackingScaling"
  autoscaling_group_name = aws_autoscaling_group.my-app-version-1.name

  estimated_instance_warmup = 300

  target_tracking_configuration {
    predefined_metric_specification {
      predefined_metric_type = "ASGAverageCPUUtilization"
    }

    target_value = 25.0
  }
}
let wrap all and create an API Gateway with "dev" as stage name and http proxy as integration type. File name is terraform/api-gw-version-1.tf
resource "aws_apigatewayv2_api" "api-gw-version-1" {
  name          = "api-gw-version-1"
  protocol_type = "HTTP"
}

resource "aws_apigatewayv2_stage" "dev" {
  api_id = aws_apigatewayv2_api.api-gw-version-1.id

  name        = "dev"
  auto_deploy = true
}

resource "aws_apigatewayv2_vpc_link" "my-app-version-1" {
  name               = "my-app-version-1"
  security_group_ids = [aws_security_group.my-app-version-1.id]
  subnet_ids = [
    aws_subnet.private-us-east-1a.id,
    aws_subnet.private-us-east-1b.id
  ]
}

resource "aws_apigatewayv2_integration" "api-gw-version-1" {
  api_id = aws_apigatewayv2_api.api-gw-version-1.id

  integration_uri    = aws_lb_listener.my-app-version-1.arn
  integration_type   = "HTTP_PROXY"
  integration_method = "ANY"
  connection_type    = "VPC_LINK"
  connection_id      = aws_apigatewayv2_vpc_link.my-app-version-1.id
}

resource "aws_apigatewayv2_route" "api-gw-version-1" {
  api_id = aws_apigatewayv2_api.api-gw-version-1.id

  route_key = "ANY /{proxy+}"
  target    = "integrations/${aws_apigatewayv2_integration.api-gw-version-1.id}"
}
Next step is to request a public certificate to secure api gateway with TLS. for this example i will use rose-tech.net which is hosted in route 53 and go for a domain validation option so as to create the record in route 53. File name is terraform/11-certificate-version-1.tf
resource "aws_acm_certificate" "api-v2" {
  domain_name       = "api-v2.rose-tech.net"
  validation_method = "DNS"
}

data "aws_route53_zone" "public-version-1" {
  name         = "rose-tech.net"
  private_zone = false
}

resource "aws_route53_record" "api-v2-validation-version-1" {
  for_each = {
    for dvo in aws_acm_certificate.api-v2.domain_validation_options : dvo.domain_name => {
      name   = dvo.resource_record_name
      record = dvo.resource_record_value
      type   = dvo.resource_record_type
    }
  }

  allow_overwrite = true
  name            = each.value.name
  records         = [each.value.record]
  ttl             = 60
  type            = each.value.type
  zone_id         = data.aws_route53_zone.public-version-1.zone_id
}

resource "aws_acm_certificate_validation" "api-v2" {
  certificate_arn         = aws_acm_certificate.api-v2.arn
  validation_record_fqdns = [for record in aws_route53_record.api-v2-validation-version-1 : record.fqdn]
}
Finally, let create a custom domain from domain hosted in route 53. Attache to it the certificate previously created and there names should match. To complete we will configure api mapping. File name is terraform/12-custom-domain-name-version-1.tf
12-custom-domain-name-version-1.tf
resource "aws_apigatewayv2_domain_name" "api-v2" {
  domain_name = "api-v2.rose-tech.net"

  domain_name_configuration {
    certificate_arn = aws_acm_certificate.api-v2.arn
    endpoint_type   = "REGIONAL"
    security_policy = "TLS_1_2"
  }

  depends_on = [aws_acm_certificate_validation.api-v2]
}

resource "aws_route53_record" "api-v2" {
  name    = aws_apigatewayv2_domain_name.api-v2.domain_name
  type    = "A"
  zone_id = data.aws_route53_zone.public-version-1.zone_id

  alias {
    name                   = aws_apigatewayv2_domain_name.api-v2.domain_name_configuration[0].target_domain_name
    zone_id                = aws_apigatewayv2_domain_name.api-v2.domain_name_configuration[0].hosted_zone_id
    evaluate_target_health = false
  }
}

resource "aws_apigatewayv2_api_mapping" "api-v2" {
  api_id      = aws_apigatewayv2_api.api-gw-version-1.id
  domain_name = aws_apigatewayv2_domain_name.api-v2.id
  stage       = aws_apigatewayv2_stage.dev.id
}

output "custom_domain_api-v2" {
  value = "https://${aws_apigatewayv2_api_mapping.api-v2.domain_name}/health"
}
Everything being set run
terraform init
terraform apply
Once our infrastructure up let hit the end point with
curl -X POST -H "Content-Type: application/json" -d '{"index":100}' https://api-v2.rose-tech.net/fibonacci
This command will run fibonacci calculation within our server and it will push it CPU utilisation above 25%
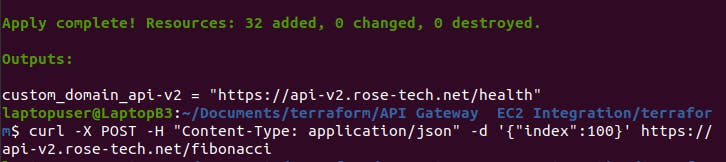
After two or four minutes go and verify your instance cpu utilisation. Triggers of fibonacci will increase CPU utilisation above 25 percent and hence Auto Scaling Group will launch an additional instance.