

Table of contents
Hello readers, in today's article we are going to create EKS Cluster with Terraform with built-in Karpenter auto-scaling capability
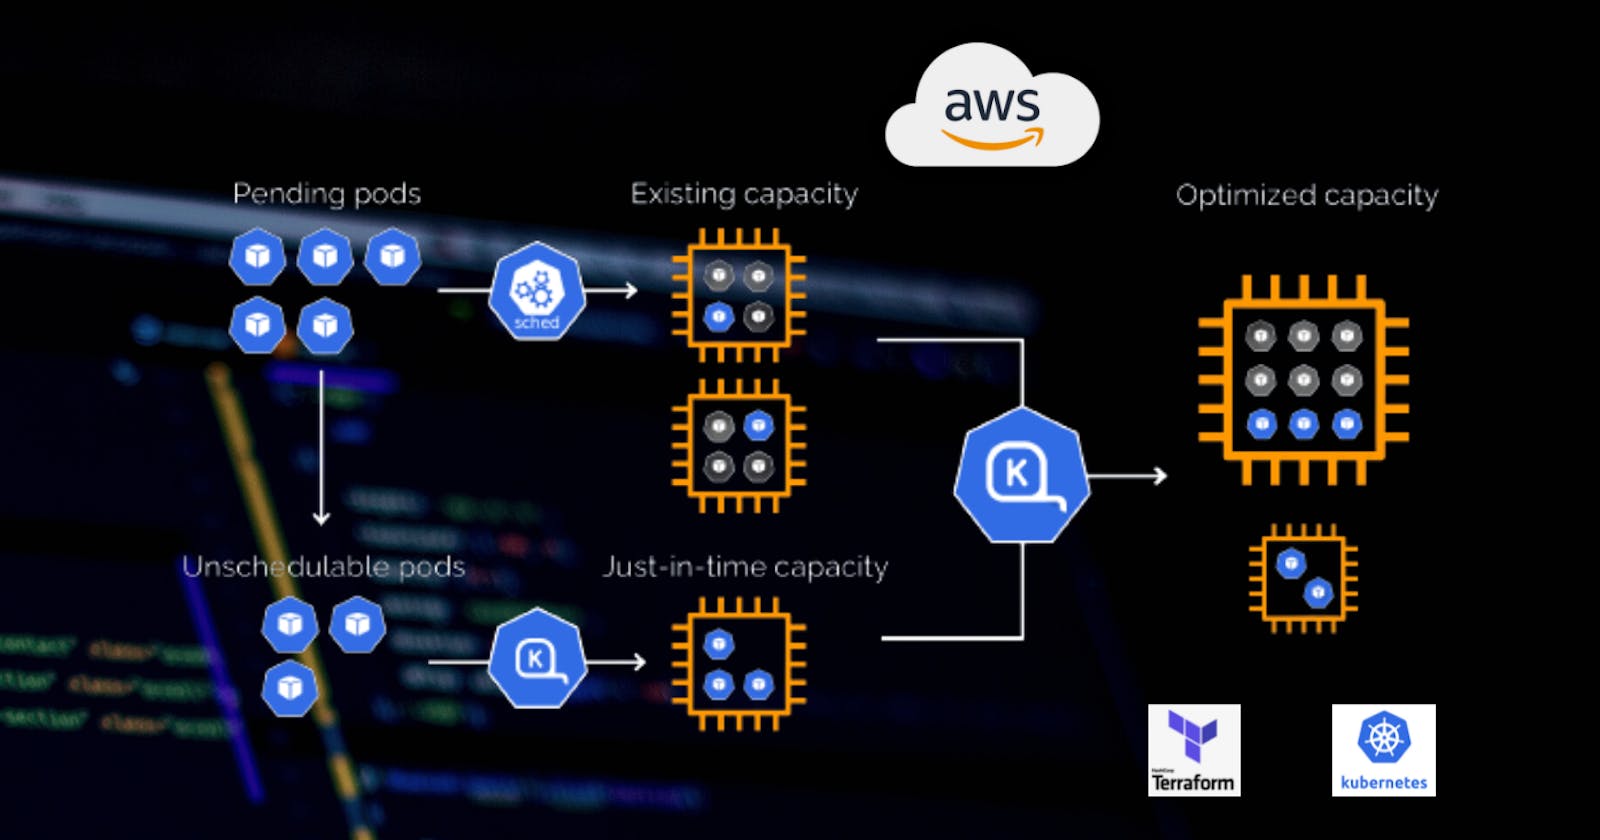
1. So what is Karpenter
Karpenter is a cluster auto scaler that takes care of scaling up and down worker nodes in your cluster for AWS EKS. It takes care of Compute provisioning for your EKS cluster and enables you to add on-demand and spot instances to your cluster.
2. Cluster Autoscaller & Karpenter & AWS Fargate
When you create a regular Kubernetes cluster in AWS,
Cluster Autoscaller
- Node group will be managed by the AWS autoscaling group.
- Cluster Autoscaller will adjust the desired size based on the load in your cluster to fit all the unschedulable pods.
Karpenter on the other hand
- creates Kubernetes nodes directly from EC2 instances.
- It improves the efficiency and cost of running workloads on that cluster.
AWS Fargate
- creates a dedicated node for each pod running in the cluster.
- With Fargate, you don't need to worry about infrastructure management and only focus on your workloads.
3. Prerequisites
- AWS CLI
- kubectl – the Kubernetes CLI
- terraform – infrastructure-as-code tool made by HashiCorp
- helm – the package manager for Kubernetes
4. Create AWS VPC Using Terraform
First of all, we need to create VPC using terraform. Provider with some variables such as EKS cluster name and a region. 0-provider.tf
variable "cluster_name" {
  default = "demo"
}

provider "aws" {
  region = "us-east-1"
}

terraform {
  required_version = "~> 1.0"

  required_providers {
    aws = {
      source  = "hashicorp/aws"
      version = "~> 4.0"
    }
    helm = {
      source  = "hashicorp/helm"
      version = "~> 2.6"
    }
  }
}
VPC resource with EFS specific parameters.
resource "aws_vpc" "main" {
  cidr_block = "10.0.0.0/16"

  # Must be enabled for EFS
  enable_dns_support   = true
  enable_dns_hostnames = true

  tags = {
    Name = "main"
  }
}
Internet Gateway. 2-igw.tf
resource "aws_internet_gateway" "igw" {
  vpc_id = aws_vpc.main.id

  tags = {
    Name = "igw"
  }
}
Four subnets, two private and two public.
resource "aws_subnet" "private-us-east-1a" {
  vpc_id            = aws_vpc.main.id
  cidr_block        = "10.0.0.0/19"
  availability_zone = "us-east-1a"

  tags = {
    "Name"                                      = "private-us-east-1a"
    "kubernetes.io/role/internal-elb"           = "1"
    "kubernetes.io/cluster/${var.cluster_name}" = "owned"
  }
}

resource "aws_subnet" "private-us-east-1b" {
  vpc_id            = aws_vpc.main.id
  cidr_block        = "10.0.32.0/19"
  availability_zone = "us-east-1b"

  tags = {
    "Name"                                      = "private-us-east-1b"
    "kubernetes.io/role/internal-elb"           = "1"
    "kubernetes.io/cluster/${var.cluster_name}" = "owned"
  }
}

resource "aws_subnet" "public-us-east-1a" {
  vpc_id                  = aws_vpc.main.id
  cidr_block              = "10.0.64.0/19"
  availability_zone       = "us-east-1a"
  map_public_ip_on_launch = true

  tags = {
    "Name"                                      = "public-us-east-1a"
    "kubernetes.io/role/elb"                    = "1"
    "kubernetes.io/cluster/${var.cluster_name}" = "owned"
  }
}

resource "aws_subnet" "public-us-east-1b" {
  vpc_id                  = aws_vpc.main.id
  cidr_block              = "10.0.96.0/19"
  availability_zone       = "us-east-1b"
  map_public_ip_on_launch = true

  tags = {
    "Name"                                      = "public-us-east-1b"
    "kubernetes.io/role/elb"                    = "1"
    "kubernetes.io/cluster/${var.cluster_name}" = "owned"
  }
}
NAT Gateway.
resource "aws_eip" "nat" {
  vpc = true

  tags = {
    Name = "nat"
  }
}

resource "aws_nat_gateway" "nat" {
  allocation_id = aws_eip.nat.id
  subnet_id     = aws_subnet.public-us-east-1a.id

  tags = {
    Name = "nat"
  }

  depends_on = [aws_internet_gateway.igw]
}
Finally two routes: one public with default route to internet gateway and a private with default route to NAT Gateway.
resource "aws_route_table" "private" {
  vpc_id = aws_vpc.main.id

  route {
    cidr_block     = "0.0.0.0/0"
    nat_gateway_id = aws_nat_gateway.nat.id
  }

  tags = {
    Name = "private"
  }
}

resource "aws_route_table" "public" {
  vpc_id = aws_vpc.main.id

  route {
    cidr_block = "0.0.0.0/0"
    gateway_id = aws_internet_gateway.igw.id
  }

  tags = {
    Name = "public"
  }
}

resource "aws_route_table_association" "private-us-east-1a" {
  subnet_id      = aws_subnet.private-us-east-1a.id
  route_table_id = aws_route_table.private.id
}

resource "aws_route_table_association" "private-us-east-1b" {
  subnet_id      = aws_subnet.private-us-east-1b.id
  route_table_id = aws_route_table.private.id
}

resource "aws_route_table_association" "public-us-east-1a" {
  subnet_id      = aws_subnet.public-us-east-1a.id
  route_table_id = aws_route_table.public.id
}

resource "aws_route_table_association" "public-us-east-1b" {
  subnet_id      = aws_subnet.public-us-east-1b.id
  route_table_id = aws_route_table.public.id
}
Let's initialize terraform and create all those components with terraform apply.
terraform init
terraform apply
5. Create EKS Cluster Using Terraform
Next, we need to create an EKS cluster and a node group. EKS requires an IAM role to access AWS API on your behave to create resources.
resource "aws_iam_role" "eks-cluster" {
  name = "eks-cluster"

  assume_role_policy = <<POLICY
{
  "Version": "2012-10-17",
  "Statement": [
    {
      "Effect": "Allow",
      "Principal": {
        "Service": "eks.amazonaws.com"
      },
      "Action": "sts:AssumeRole"
    }
  ]
}
POLICY
}

resource "aws_iam_role_policy_attachment" "amazon-eks-cluster-policy" {
  policy_arn = "arn:aws:iam::aws:policy/AmazonEKSClusterPolicy"
  role       = aws_iam_role.eks-cluster.name
}

resource "aws_eks_cluster" "cluster" {
  name     = var.cluster_name
  version  = "1.22"
  role_arn = aws_iam_role.eks-cluster.arn

  vpc_config {

    endpoint_private_access = false
    endpoint_public_access  = true
    public_access_cidrs     = ["0.0.0.0/0"]

    subnet_ids = [
      aws_subnet.private-us-east-1a.id,
      aws_subnet.private-us-east-1b.id,
      aws_subnet.public-us-east-1a.id,
      aws_subnet.public-us-east-1b.id
    ]
  }

  depends_on = [aws_iam_role_policy_attachment.amazon-eks-cluster-policy]
}
Now we need to create another IAM role for Kubernetes nodes. It's going to be used by the regular node pool and not Karpenter.
You have two options, either to use the same IAM role and create an instance profile for Karpenter or you can create a dedicated IAM role. But in this case, you would need to manually update auth configmap to authorize nodes created by karpenter with a new IAM role to join the cluster.
resource "aws_iam_role" "nodes" {
  name = "eks-node-group"

  assume_role_policy = jsonencode({
    Statement = [{
      Action = "sts:AssumeRole"
      Effect = "Allow"
      Principal = {
        Service = "ec2.amazonaws.com"
      }
    }]
    Version = "2012-10-17"
  })
}

resource "aws_iam_role_policy_attachment" "amazon-eks-worker-node-policy" {
  policy_arn = "arn:aws:iam::aws:policy/AmazonEKSWorkerNodePolicy"
  role       = aws_iam_role.nodes.name
}

resource "aws_iam_role_policy_attachment" "amazon-eks-cni-policy" {
  policy_arn = "arn:aws:iam::aws:policy/AmazonEKS_CNI_Policy"
  role       = aws_iam_role.nodes.name
}

resource "aws_iam_role_policy_attachment" "amazon-ec2-container-registry-read-only" {
  policy_arn = "arn:aws:iam::aws:policy/AmazonEC2ContainerRegistryReadOnly"
  role       = aws_iam_role.nodes.name
}

resource "aws_eks_node_group" "private-nodes" {
  cluster_name    = aws_eks_cluster.cluster.name
  version         = "1.22"
  node_group_name = "private-nodes"
  node_role_arn   = aws_iam_role.nodes.arn

  subnet_ids = [
    aws_subnet.private-us-east-1a.id,
    aws_subnet.private-us-east-1b.id
  ]

  capacity_type  = "ON_DEMAND"
  instance_types = ["t3.small"]

  scaling_config {
    desired_size = 1
    max_size     = 10
    min_size     = 0
  }

  update_config {
    max_unavailable = 1
  }

  labels = {
    role = "general"
  }

  depends_on = [
    aws_iam_role_policy_attachment.amazon-eks-worker-node-policy,
    aws_iam_role_policy_attachment.amazon-eks-cni-policy,
    aws_iam_role_policy_attachment.amazon-ec2-container-registry-read-only,
  ]

  # Allow external changes without Terraform plan difference
  lifecycle {
    ignore_changes = [scaling_config[0].desired_size]
  }
}
Now let's again apply the terraform to create an EKS cluster.
terraform apply
To connect to the cluster you need to update the Kubernetes context with this command.
aws eks update-kubeconfig --name demo --region us-east-1
Then the quick check if we can reach Kubernetes. It should return the default k8s service.
kubectl get svc

As I mentioned before, if you decide to create a separate IAM role and instance profile you would need to edit the auth configmap to add the ARN of the new role.
kubectl edit configmap aws-auth -n kube-system

6. Create Karpenter Controller IAM Role
Karpenter needs permissions to create EC2 instances in AWS. If you use a self-hosted Kubernetes cluster, for example by using kOps. You can add additional IAM policies to the existing IAM role attached to Kubernetes nodes. We use EKS, the best way to grant access to internal service would be with IAM roles for service accounts.
First, we need to create an OpenID Connect provider.
data "tls_certificate" "eks" {
  url = aws_eks_cluster.cluster.identity[0].oidc[0].issuer
}

resource "aws_iam_openid_connect_provider" "eks" {
  client_id_list  = ["sts.amazonaws.com"]
  thumbprint_list = [data.tls_certificate.eks.certificates[0].sha1_fingerprint]
  url             = aws_eks_cluster.cluster.identity[0].oidc[0].issuer
}
Next is a trust policy to allow the Kubernetes service account to assume the IAM role. Make sure that you deploy Karpenter to the karpenter namespace with the same service account name.
9-karpenter-controller-role.tf
data "aws_iam_policy_document" "karpenter_controller_assume_role_policy" {
  statement {
    actions = ["sts:AssumeRoleWithWebIdentity"]
    effect  = "Allow"

    condition {
      test     = "StringEquals"
      variable = "${replace(aws_iam_openid_connect_provider.eks.url, "https://", "")}:sub"
      values   = ["system:serviceaccount:karpenter:karpenter"]
    }

    principals {
      identifiers = [aws_iam_openid_connect_provider.eks.arn]
      type        = "Federated"
    }
  }
}

resource "aws_iam_role" "karpenter_controller" {
  assume_role_policy = data.aws_iam_policy_document.karpenter_controller_assume_role_policy.json
  name               = "karpenter-controller"
}

resource "aws_iam_policy" "karpenter_controller" {
  policy = file("./controller-trust-policy.json")
  name   = "KarpenterController"
}

resource "aws_iam_role_policy_attachment" "aws_load_balancer_controller_attach" {
  role       = aws_iam_role.karpenter_controller.name
  policy_arn = aws_iam_policy.karpenter_controller.arn
}

resource "aws_iam_instance_profile" "karpenter" {
  name = "KarpenterNodeInstanceProfile"
  role = aws_iam_role.nodes.name
}
Let's create the controller-trust-policy.json file.
controller-trust-policy.json
{
    "Statement": [
        {
            "Action": [
                "ssm:GetParameter",
                "iam:PassRole",
                "ec2:RunInstances",
                "ec2:DescribeSubnets",
                "ec2:DescribeSecurityGroups",
                "ec2:DescribeLaunchTemplates",
                "ec2:DescribeInstances",
                "ec2:DescribeInstanceTypes",
                "ec2:DescribeInstanceTypeOfferings",
                "ec2:DescribeAvailabilityZones",
                "ec2:DeleteLaunchTemplate",
                "ec2:CreateTags",
                "ec2:CreateLaunchTemplate",
                "ec2:CreateFleet"
            ],
            "Effect": "Allow",
            "Resource": "*",
            "Sid": "Karpenter"
        },
        {
            "Action": "ec2:TerminateInstances",
            "Condition": {
                "StringLike": {
                    "ec2:ResourceTag/Name": "*karpenter*"
                }
            },
            "Effect": "Allow",
            "Resource": "*",
            "Sid": "ConditionalEC2Termination"
        }
    ],
    "Version": "2012-10-17"
}
Since we've added an additional provider we need to initialize before we can apply the terraform code.
terraform init
terraform apply
7. Deploy Karpenter to EKS
To deploy Karpenter to our cluster, we're going to use Helm. First of all, you need to authenticate with EKS using the helm provider. Then the helm release.
provider "helm" {
  kubernetes {
    host                   = aws_eks_cluster.cluster.endpoint
    cluster_ca_certificate = base64decode(aws_eks_cluster.cluster.certificate_authority[0].data)

    exec {
      api_version = "client.authentication.k8s.io/v1beta1"
      args        = ["eks", "get-token", "--cluster-name", aws_eks_cluster.cluster.id]
      command     = "aws"
    }
  }
}

resource "helm_release" "karpenter" {
  namespace        = "karpenter"
  create_namespace = true

  name       = "karpenter"
  repository = "https://charts.karpenter.sh"
  chart      = "karpenter"
  version    = "v0.13.1"

  set {
    name  = "serviceAccount.annotations.eks\\.amazonaws\\.com/role-arn"
    value = aws_iam_role.karpenter_controller.arn
  }

  set {
    name  = "clusterName"
    value = aws_eks_cluster.cluster.id
  }

  set {
    name  = "clusterEndpoint"
    value = aws_eks_cluster.cluster.endpoint
  }

  set {
    name  = "aws.defaultInstanceProfile"
    value = aws_iam_instance_profile.karpenter.name
  }

  depends_on = [aws_eks_node_group.private-nodes]
}
Let's apply and check if the controller is running.
terraform apply
Check if the helm was deployed successfully. Then the karpenter pod in its dedicated namespace.
helm list -A
kubectl get pods -n karpenter

8. Create Karpenter Provisioner
Before we can test Karpenter, we need to create a Provisioner. Karpenter defines a Custom Resource called a Provisioner to specify provisioning configuration. Each provisioner manages a distinct set of nodes. You need to replace the demo with your EKS cluster name.
provisioner.yaml
---
apiVersion: karpenter.sh/v1alpha5
kind: Provisioner
metadata:
  name: default
spec:
  ttlSecondsAfterEmpty: 60 # scale down nodes after 60 seconds without workloads (excluding daemons)
  ttlSecondsUntilExpired: 604800 # expire nodes after 7 days (in seconds) = 7 * 60 * 60 * 24
  limits:
    resources:
      cpu: 100 # limit to 100 CPU cores
  requirements:
    # Include general purpose instance families
    - key: karpenter.k8s.aws/instance-family
      operator: In
      values: [c5, m5, r5]
    # Exclude small instance sizes
    - key: karpenter.k8s.aws/instance-size
      operator: NotIn
      values: [nano, micro, small, large]
  providerRef:
    name: my-provider
---
apiVersion: karpenter.k8s.aws/v1alpha1
kind: AWSNodeTemplate
metadata:
  name: my-provider
spec:
  subnetSelector:
    kubernetes.io/cluster/demo: owned
  securityGroupSelector:
    kubernetes.io/cluster/demo: owned
Finally, use kubectl to create those resources in the cluster.
kubectl apply -f k8s/provisioner.yaml
9. Demo: Automatic Node Provisioning
Lastly, let's create a Kubernetes deployment to test how quickly Karpenter can create EC2 instances and schedule new pods.
deployment.yaml
---
apiVersion: apps/v1
kind: Deployment
metadata:
  name: nginx-deployment
  labels:
    app: nginx
spec:
  replicas: 5
  selector:
    matchLabels:
      app: nginx
  template:
    metadata:
      labels:
        app: nginx
    spec:
      containers:
      - name: nginx
        image: nginx:1.14.2
        resources:
          requests:
            cpu: "4"
            memory: 4Gi
        ports:
        - containerPort: 80
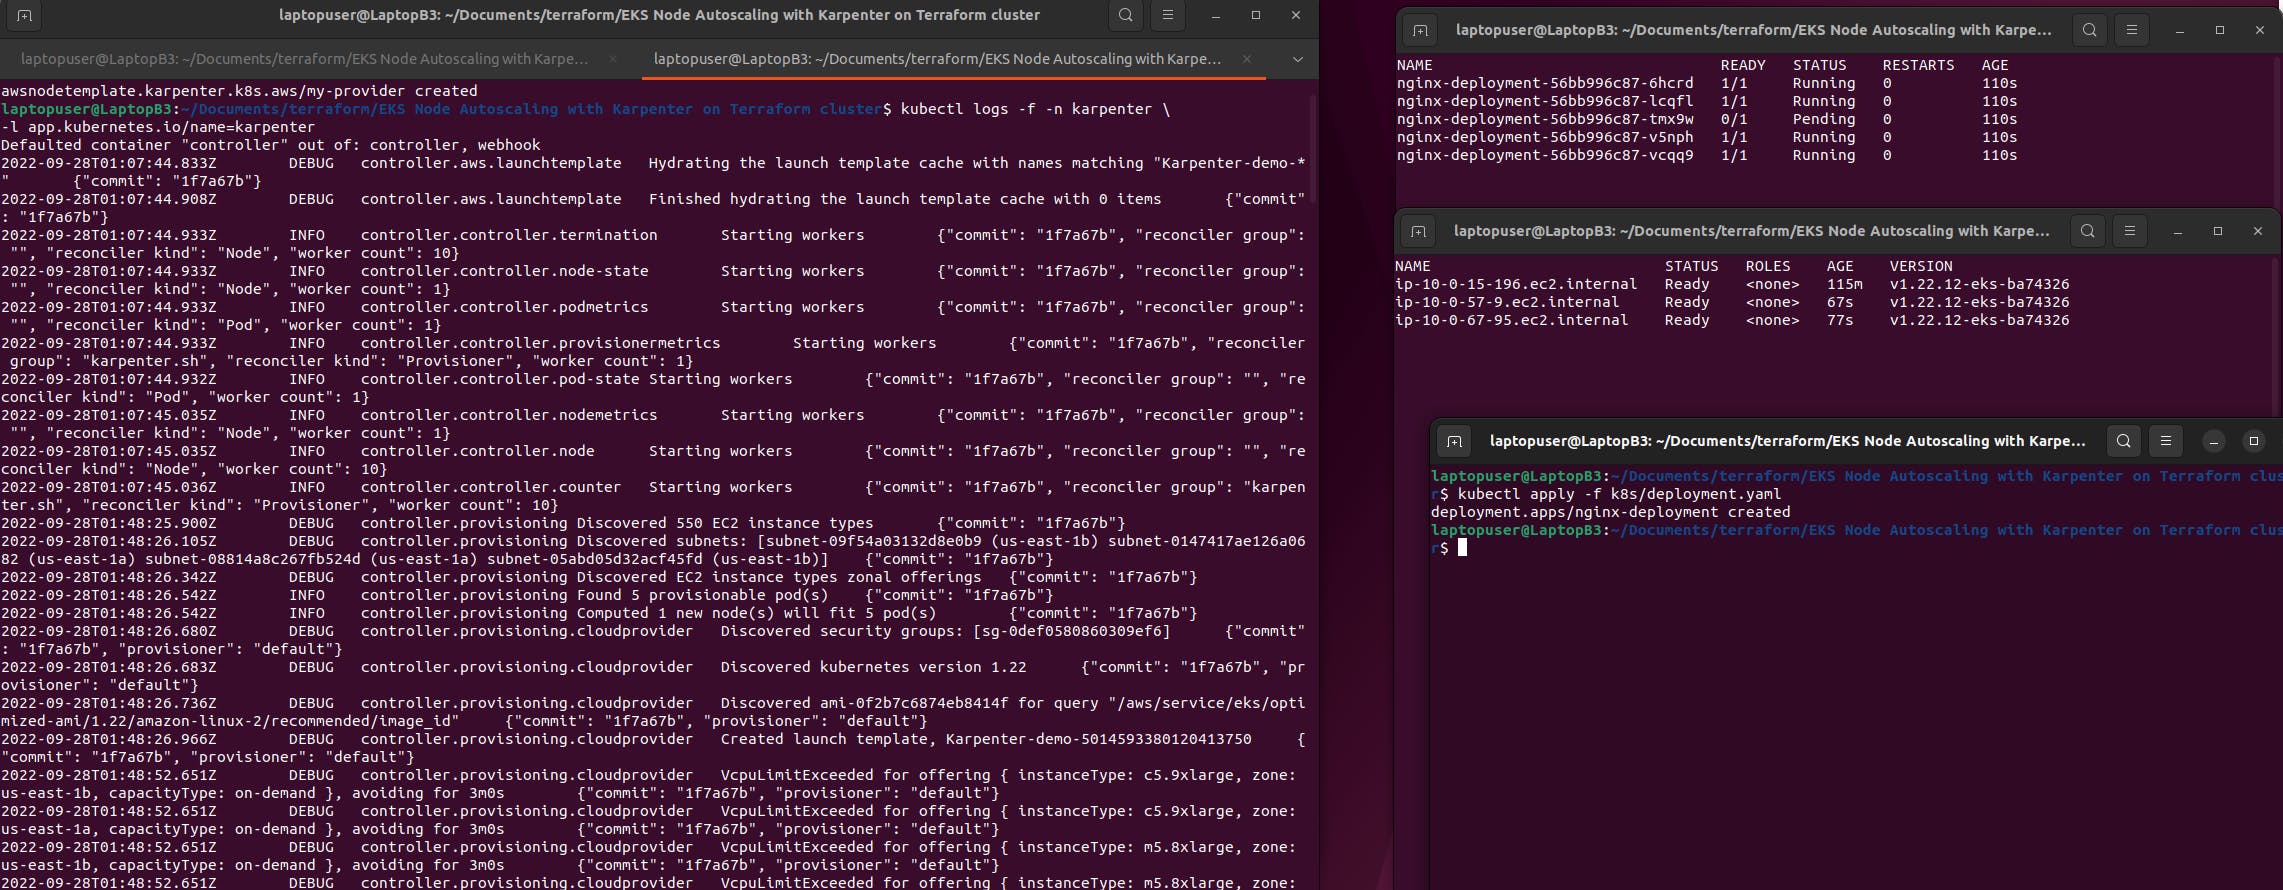
When you just getting started with Karpenter, it's a good idea to check logs in case you get any errors.
kubectl logs -f -n karpenter \
-l app.kubernetes.io/name=karpenter
In another window, let's run get pods.
watch -n 1 -t kubectl get pods
Then let's get all the nodes available in the Kubernetes cluster.
watch -n 1 -t kubectl get nodes
Finally, create the deployment with 5 replicas.
kubectl apply -f k8s/deployment.yaml
Cleanup
To avoid additional charges, remove the demo infrastructure from your AWS account So that’s all about it.
Hope it helps. Let us know your feedback or queries on comments.