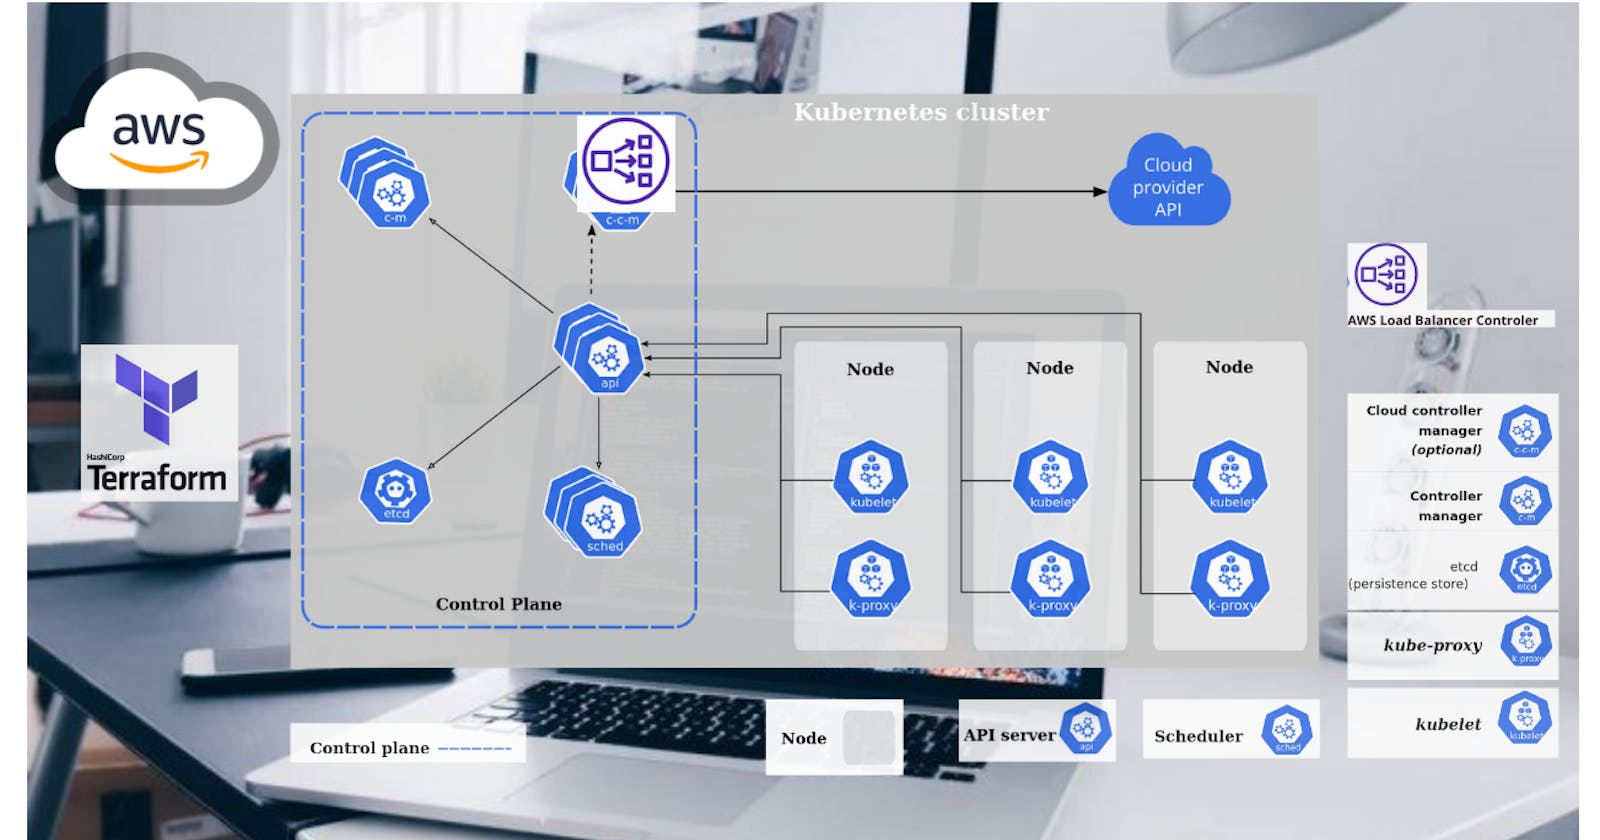


Hello readers, in today's article we are going to see the relatively new AWS Load Balancer Controller. It replaces built in Kubernetes component responsible for creating services and ingresses.
AWS Load balancer controller uses ;
- Application Load Balancer to create ingresses and
- Network Load Balancers to create services of type LoadBalancer.
By default, when you use this controller to create ingresses, it creates a separate load balancer for each ingress, but you can use IngressGroup to merge multiple ingresses into a single load balancer.
It also supports two modes;
- Instance mode, which will route traffic via node and then to the pod, and
- IP mode, which routes traffic directly to the pod ip address.
AWS Load Balancer Controller can also be deployed on self-hosted Kubernetes clusters and not only on EKS. In this article, I'll show you multiple ways to deploy this Controller to the Kubernetes.
We will use terraform to provision infrastructure, plain yaml, then Helm chart, including creating an open id connect provider and deploying the controller to the cluster using terraform helm provider.
With terraform code that I provide, you can simply update the EKS cluster name and run terraform apply to create everything from scratch, including VPC.
So if you're looking for the fastest way to start, clone this github repo
and just run
terraform apply
Outputs
Also, we are going to go over 5 examples.
Simple Ingress,
we will create a simple name-based virtual hosting ingress using the Instance mode.
Multiple ingresses using same Load Balancer
I'll show you how to use IngressGroup to merge multiple ingresses into a single load balancer.
Secure Ingress with SSL/TLS,
Of course, we need TLS to securely expose any service to the internet. In the part, we can issue a certificate from AWS Certificate Manager and attach it to the ingress. But we will use the auto-discovery mechanism to find a matching certificate.
Automatically create DNS for ingress,
I'll show you how to automatically create DNS records in Route53 by using an external-dns controller.
finally Create service of type load balancer ,
we will create not ingress but the service of type load balancer using the AWS Load Balancer Controller and network load balancer.
You can find the source code in my github repository. Also, let's connect on LinkedIn.
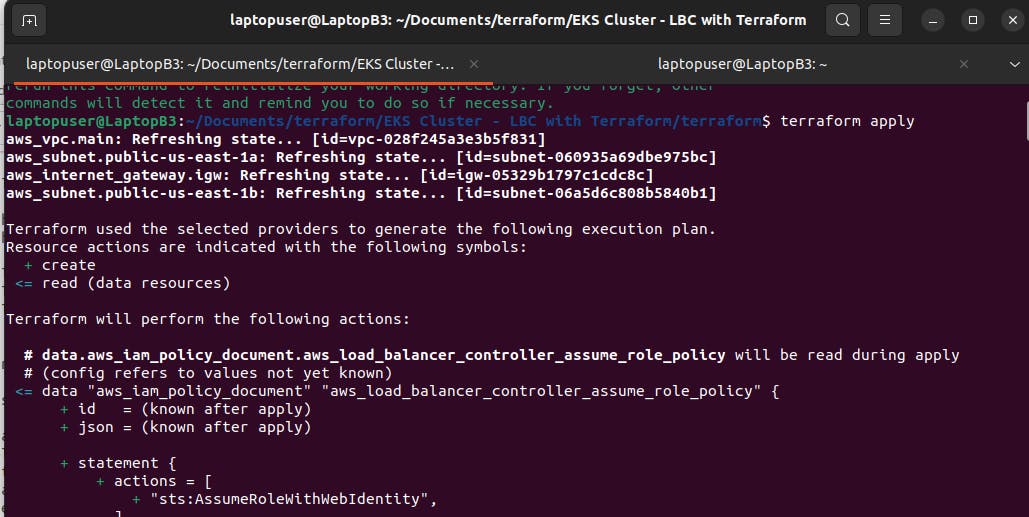
Alright, let's get started. AWS Load balancer controller would need access to create at least AWS load balancers themselves. Since we're using EKS, the best and most secure way to access AWS services from Kubernetes is to use the Open ID connect provider and establish trust between the AWS IAM system and the Kubernetes RBAC system. I'll show you ways how you can get started with IAM roles. To better understand what's going on under the hood, first, I'll create an Open ID connect provider, IAM policy, and IAM role using the Terraform. The name of the EKS cluster is a demo. We need to update the aws load balancer controller later with this name.
We need to create the OpenID Connect provider, IAM policy, and role using the terraform.
Here we have the terraform code to create a brand new VPC, internet gateway, subnets, nat, route tables, eks, and a node pool. Now we need to create an Open Id connect provider.
First of all, we need to get a tls certificate from eks. Then the resource to create a provider. So let give it a name terraform/8-iam-oidc.tf.
data "tls_certificate" "eks" {
  url = aws_eks_cluster.cluster.identity[0].oidc[0].issuer
}

resource "aws_iam_openid_connect_provider" "eks" {
  client_id_list  = ["sts.amazonaws.com"]
  thumbprint_list = [data.tls_certificate.eks.certificates[0].sha1_fingerprint]
  url             = aws_eks_cluster.cluster.identity[0].oidc[0].issuer
}
The second file will contain terraform code to create IAM role and policy and establish trust. So let give it a name terraform/9-iam-controller.tf
data "aws_iam_policy_document" "aws_load_balancer_controller_assume_role_policy" {
  statement {
    actions = ["sts:AssumeRoleWithWebIdentity"]
    effect  = "Allow"

    condition {
      test     = "StringEquals"
      variable = "${replace(aws_iam_openid_connect_provider.eks.url, "https://", "")}:sub"
      values   = ["system:serviceaccount:kube-system:aws-load-balancer-controller"]
    }

    principals {
      identifiers = [aws_iam_openid_connect_provider.eks.arn]
      type        = "Federated"
    }
  }
}

resource "aws_iam_role" "aws_load_balancer_controller" {
  assume_role_policy = data.aws_iam_policy_document.aws_load_balancer_controller_assume_role_policy.json
  name               = "aws-load-balancer-controller"
}

resource "aws_iam_policy" "aws_load_balancer_controller" {
  policy = file("./AWSLoadBalancerController.json")
  name   = "AWSLoadBalancerController"
}

resource "aws_iam_role_policy_attachment" "aws_load_balancer_controller_attach" {
  role       = aws_iam_role.aws_load_balancer_controller.name
  policy_arn = aws_iam_policy.aws_load_balancer_controller.arn
}

output "aws_load_balancer_controller_role_arn" {
  value = aws_iam_role.aws_load_balancer_controller.arn
}
The first policy will allow Kubernetes aws-load-balancer-controller service account from the kube-system namespace to assume our role. Then let's create an IAM role aws-load-balancer-controller. We also need to create an IAM policy. You can either paste the json content directly to the terraform code, or if it's a big file, you can use a file function to read it and pipe it to terraform. Then attach this policy to the role that we just defined.
We need to create json policy file in the same directory. Let's call it AWSLoadBalancerController.json and then copy and paste it from the github project.
Now save it and go to the terminal, and initialize the terraform. When it's completed, run terraform apply to create a provider and role for Kubernetes service
account.
Whenever you create a new EKS cluster with terraform, you need to update the Kubernetes context with the aws eks command.
aws eks --region us-east-1 update-kubeconfig --name ClusterName
After that, just a quick check with kubectl if we can get a Kubernetes api service.
kubectl get svc
Deploy AWS Load Balancer Controller with YAML It's time to deploy the AWS load balancer controller to Kubernetes.
I'll deploy it with Helm and terraform.
You just need to pick one approach that you want to use.
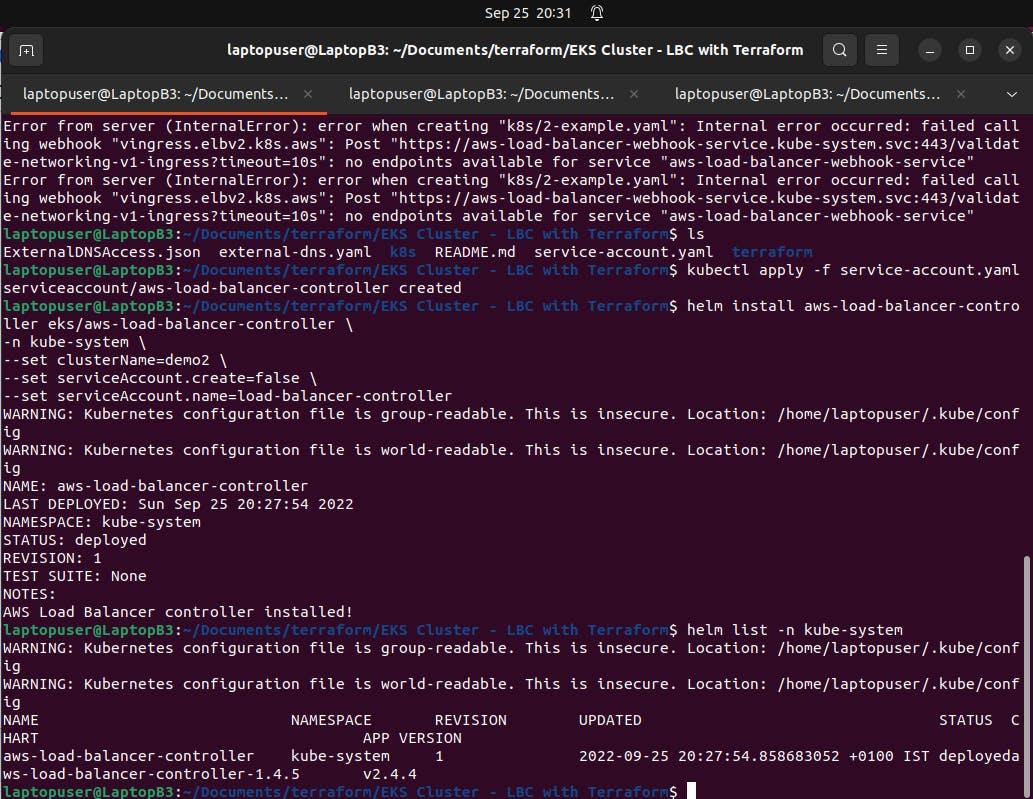
I'll start with Helm, unlike Yaml, Helm approach doesn't require additional component cert-manager to
install you can install it with a single kubectl apply command.
To deploy the AWS load balancer controller with HELM. we need to add a helm repository.
helm repo add eks https://aws.github.io/eks-charts
Then we can create a Kubernetes service account manually, So let give it a name /service-account.yaml
---
apiVersion: v1
kind: ServiceAccount
metadata:
  name: aws-load-balancer-controller
  namespace: kube-system
  annotations:
    eks.amazonaws.com/role-arn: arn:aws:iam::496437865731:role/aws-load-balancer-controller
It's going to be exactly the same account and the same annotation with arn of the IAM role. Let's apply it.
kubectl apply -f service-account.yaml
Now we can deploy the aws load balancer controller.
helm install aws-load-balancer-controller eks/aws-load-balancer-controller \
-n kube-system \
--set clusterName=ClusterName \
--set serviceAccount.create=false \
--set serviceAccount.name=load-balancer-controller
The important part is to substitute your EKS cluster name, then disable service account creation, and you must specify the same account name.
- Deploy AWS Load Balancer Controller with Terraform & HELM
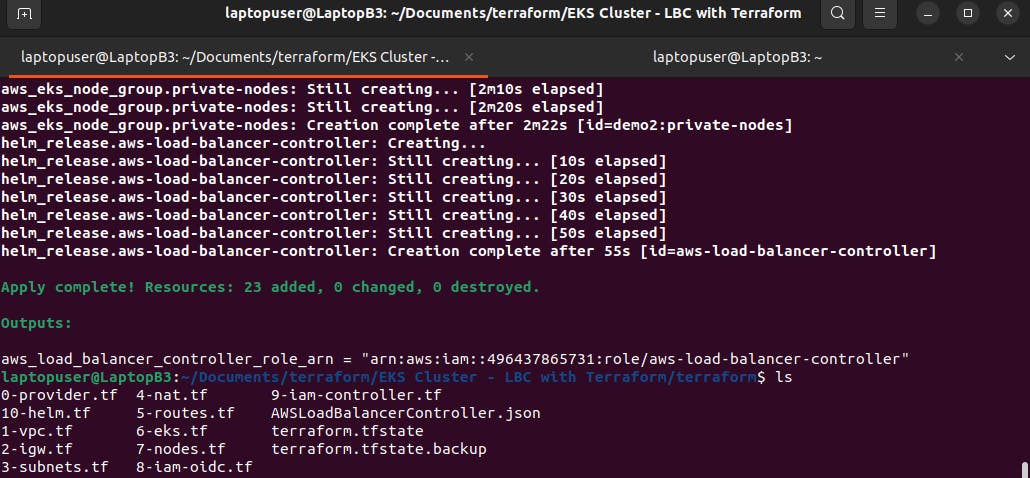
We will automate AWS VPC, EKS, and controller creation using the terraform. Let's create another terraform file for the helm.
Terraform has a Helm provider that allows you to deploy Helm charts to Kubernetes. There are a couple of methods to authenticate with the Kubernetes cluster. You can use the Kubernetes context, or I would recommend if you use EKS to automatically obtain the token.
if you created AWS VPC and EKS using terraform, you can grab these variables from those terraform resources, Then the certificate.
Next, let's deploy the helm chart. To do that, you need to use the helm_release resource. Same name as before aws-load-balancer-controller, and the repository. You don't need to add helm repos; you can just use them directly. Also, I suggest that you start with version "1.4.1" and upgrade later if the deployment was successful.
If you deploy the aws load balancer controller together with VPC and EKS, you need to explicitly depend on those resources.
So let give it a name terraform/10-helm.tf
provider "helm" {
  kubernetes {
    host                   = aws_eks_cluster.cluster.endpoint
    cluster_ca_certificate = base64decode(aws_eks_cluster.cluster.certificate_authority[0].data)
    exec {
      api_version = "client.authentication.k8s.io/v1beta1"
      args        = ["eks", "get-token", "--cluster-name", aws_eks_cluster.cluster.id]
      command     = "aws"
    }
  }
}

resource "helm_release" "aws-load-balancer-controller" {
  name = "aws-load-balancer-controller"

  repository = "https://aws.github.io/eks-charts"
  chart      = "aws-load-balancer-controller"
  namespace  = "kube-system"
  version    = "1.4.1"

  set {
    name  = "clusterName"
    value = aws_eks_cluster.cluster.id
  }

  set {
    name  = "image.tag"
    value = "v2.4.2"
  }

  set {
    name  = "serviceAccount.name"
    value = "aws-load-balancer-controller"
  }

  set {
    name  = "serviceAccount.annotations.eks\\.amazonaws\\.com/role-arn"
    value = aws_iam_role.aws_load_balancer_controller.arn
  }

  depends_on = [
    aws_eks_node_group.private-nodes,
    aws_iam_role_policy_attachment.aws_load_balancer_controller_attach
  ]
}
Now go back to terraform, initialize and apply.
Highly recommend before you deploy your first ingress, run the kubectl logs command to verify that there are no errors in the controller.
helm list -n kube-system

kubectl logs -f -n kube-system \
-l app.kubernetes.io/name=aws-load-balancer-controller
1 - Simple Ingress (1-simple-ingress-example)
Let's create a first simple ingress. Simple deployment with echoserver.
There are two modes;
IP mode and Instance mode
Instance mode will require a service type of NodePort with NodePort service type, kube-proxy will open a port on your worker node instances to which the ALB can route traffic.
There are a lot of annotations that this ingress controller support. For example, if we want to expose our service to the internet, we can do that with an annotation scheme equal to internet-facing. This will create a public load balancer. You can also create services and ingresses with private IPs only.
Then we need to specify the ingress class of our controller. For the spec, let's use domain routing and redirect all the traffic from echo.rose-tech.net to our Kubernetes echoserver on port 80.
---
apiVersion: v1
kind: Namespace
metadata:
  name: 1-simple-ingress-example
---
apiVersion: apps/v1
kind: Deployment
metadata:
  name: echoserver
  namespace: 1-simple-ingress-example
spec:
  selector:
    matchLabels:
      app: echoserver
  replicas: 1
  template:
    metadata:
      labels:
        app: echoserver
    spec:
      containers:
        - image: k8s.gcr.io/e2e-test-images/echoserver:2.5
          name: echoserver
          ports:
            - containerPort: 8080
---
apiVersion: v1
kind: Service
metadata:
  name: echoserver
  namespace: 1-simple-ingress-example
spec:
  ports:
    - port: 80
      targetPort: 8080
      protocol: TCP
  type: NodePort
  selector:
    app: echoserver
---
apiVersion: networking.k8s.io/v1
kind: Ingress
metadata:
  name: echoserver
  namespace: 1-simple-ingress-example
  annotations:
    alb.ingress.kubernetes.io/scheme: internet-facing
    alb.ingress.kubernetes.io/tags: Environment=dev,Team=test
spec:
  ingressClassName: alb
  rules:
    - host: echo.rose-tech.net
      http:
        paths:
          - path: /
            pathType: Exact
            backend:
              service:
                name: echoserver
                port:
                  number: 80
Now let's apply our first example.
kubectl apply -f k8s/simple-ingress-example.yaml
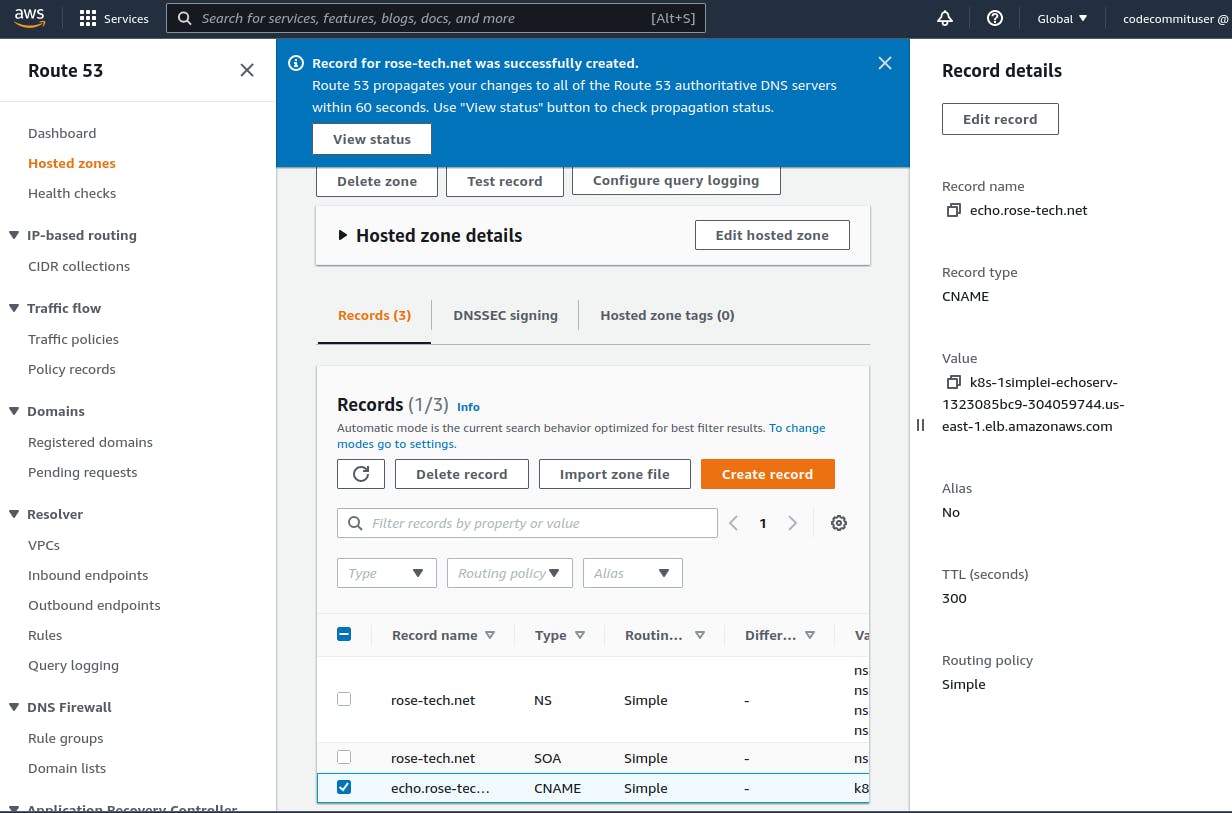
You can also get the ingresses in example 1 namespace. If you see a hostname of the load balancer, it's a good sign.

Now we need to create a CNAME record to test ingress. My rose-tech.net is hosted in Route 53 domains, so I'm going to create a CNAME record there.
You can go to load balancers in aws to inspect your ALB.
Type is an application, which refers to the application load balancer.
Also, it's internet-facing with public IPs reachable from the internet. And some
security groups.
The application load balancer supports security groups; on the other hand, the network load balancer uses security groups on the EC2 instances. Under listener, you can find an http port 80.
You can go to firefox and paste your domain name.
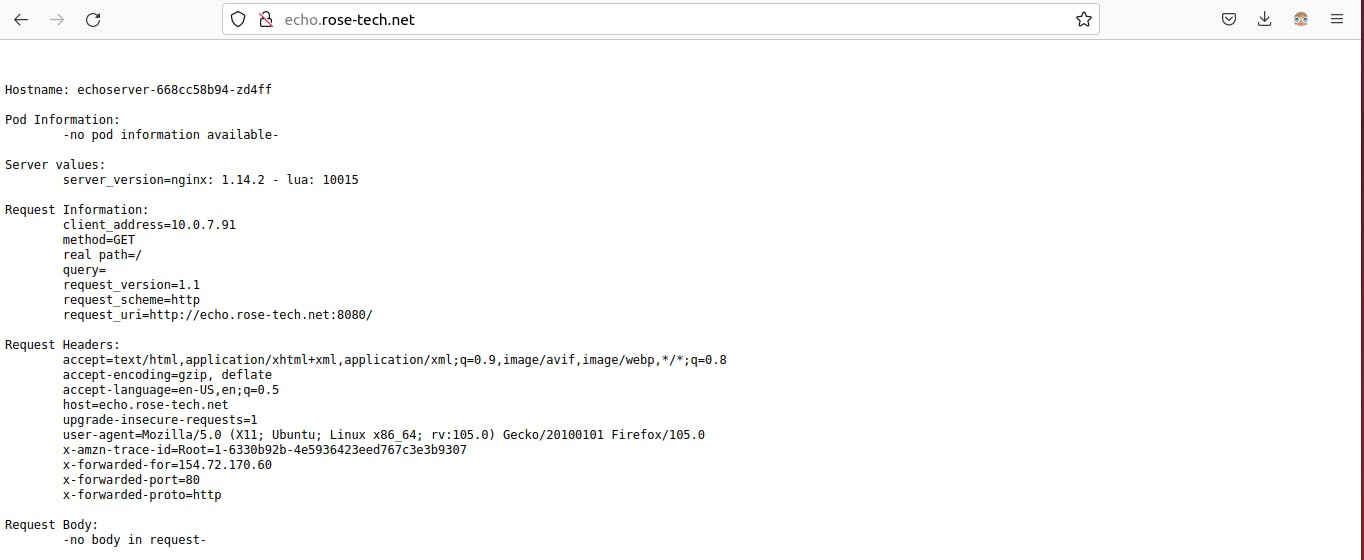
Looks like it's working. You can find some metadata from echoserver. It can help you to debug.
2 - Multiple Ingresses (2-multiple-ingresses-example)
Using same Load Balancer by default, the aws load balancer controller will create a dedicated application load balancer for each ingress resource. However, there is a way if you want to combine multiple ingresses and use a single load balancer.
In this example, we will create 2 ingresses in different namespaces and force them to merge ingress rules into a single application load balancer. I'm going to create two namespaces, 2-multiple-ingresses-example-service-a and 2-multiple-ingresses-example-service-b
Then exactly the same deployment with echoserver image. Finally, ingress resources. It's going to be internet-facing. Then the key annotation. By default, Ingresses don't belong to any IngressGroup, and the controller treats it as a "implicit IngressGroup" consisting of the Ingress itself. Now Ingresses with the same group.name annotation will form an "explicit IngressGroup", and be managed by a single aws load balancer.
---
apiVersion: v1
kind: Namespace
metadata:
  name: 2-multiple-ingresses-example-service-a
---
apiVersion: apps/v1
kind: Deployment
metadata:
  name: echoserver
  namespace: 2-multiple-ingresses-example-service-a
spec:
  selector:
    matchLabels:
      app: echoserver
  replicas: 1
  template:
    metadata:
      labels:
        app: echoserver
    spec:
      containers:
        - image: k8s.gcr.io/e2e-test-images/echoserver:2.5
          name: echoserver
          ports:
            - containerPort: 8080
---
apiVersion: v1
kind: Service
metadata:
  name: echoserver
  namespace: 2-multiple-ingresses-example-service-a
spec:
  ports:
    - port: 80
      targetPort: 8080
      protocol: TCP
  type: NodePort
  selector:
    app: echoserver
---
apiVersion: networking.k8s.io/v1
kind: Ingress
metadata:
  name: echoserver
  namespace: 2-multiple-ingresses-example-service-a
  annotations:
    alb.ingress.kubernetes.io/scheme: internet-facing
    alb.ingress.kubernetes.io/group.name: 2-multiple-ingresses-example
    alb.ingress.kubernetes.io/group.order: '1'
spec:
  ingressClassName: alb
  rules:
    - host: service-a.rose-tech.net
      http:
        paths:
          - path: /
            pathType: Exact
            backend:
              service:
                name: echoserver
                port:
                  number: 80
---
apiVersion: v1
kind: Namespace
metadata:
  name: 2-multiple-ingresses-example-service-b
---
apiVersion: apps/v1
kind: Deployment
metadata:
  name: echoserver
  namespace: 2-multiple-ingresses-example-service-b
spec:
  selector:
    matchLabels:
      app: echoserver
  replicas: 1
  template:
    metadata:
      labels:
        app: echoserver
    spec:
      containers:
        - image: k8s.gcr.io/e2e-test-images/echoserver:2.5
          name: echoserver
          ports:
            - containerPort: 8080
---
apiVersion: v1
kind: Service
metadata:
  name: echoserver
  namespace: 2-multiple-ingresses-example-service-b
spec:
  ports:
    - port: 80
      targetPort: 8080
      protocol: TCP
  type: NodePort
  selector:
    app: echoserver
---
apiVersion: networking.k8s.io/v1
kind: Ingress
metadata:
  name: echoserver
  namespace: 2-multiple-ingresses-example-service-b
  annotations:
    alb.ingress.kubernetes.io/scheme: internet-facing
    alb.ingress.kubernetes.io/group.name: 2-multiple-ingresses-example
    alb.ingress.kubernetes.io/group.order: '2'
spec:
  ingressClassName: alb
  rules:
    - host: service-b.rose-tech.net
      http:
        paths:
          - path: /
            pathType: Exact
            backend:
              service:
                name: echoserver
                port:
                  number: 80
Any ingresses with the same group name will use a single ALB.
As well as service. Now to place this ingress in the same IngressGroup, we use group.name annotation with the exact same value.
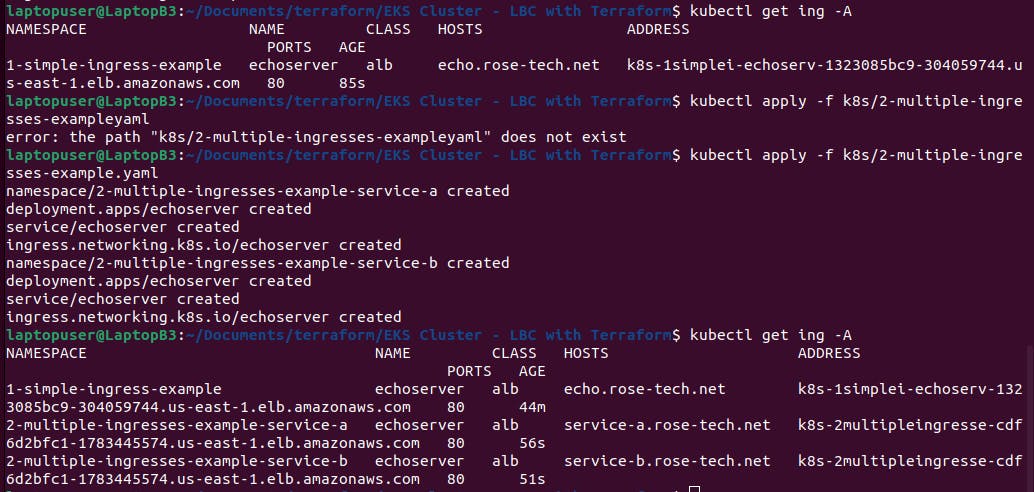
Now let apply it
kubectl apply -f k8s/2-multiple-ingresses-example.yaml
Run kubectl get ing -A stand for all namespaces.
We get two ingresses that use the same load balancer as you can see by the dns.
To test it, we also need to create CNAME records. They both will point to the same load balancer.
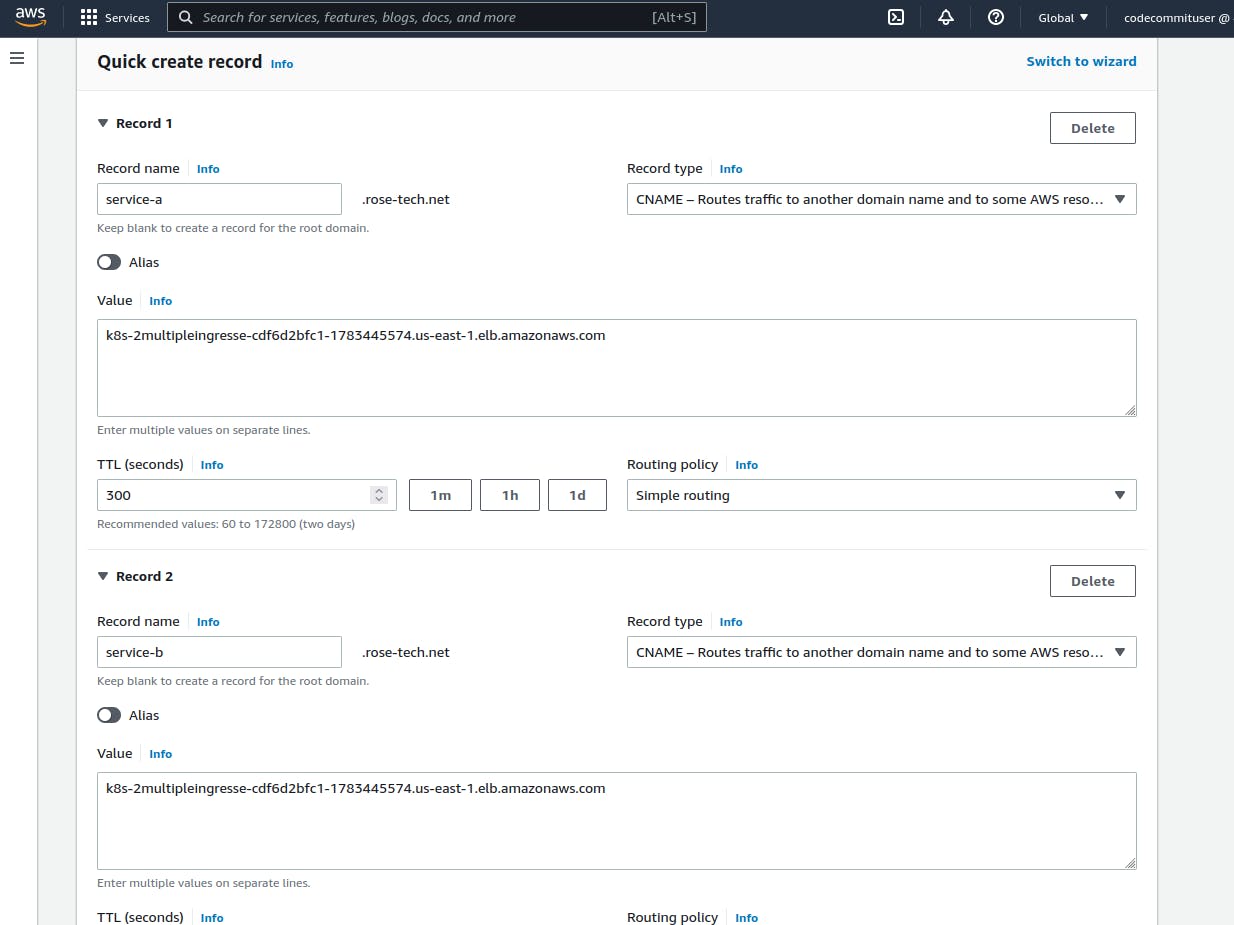
Let's verify that we can resolve each domain name
dig +short service-a.rose-tech.net
dig +short service-b.rose-tech.net

and use curl or go to the web browser to verify routing.
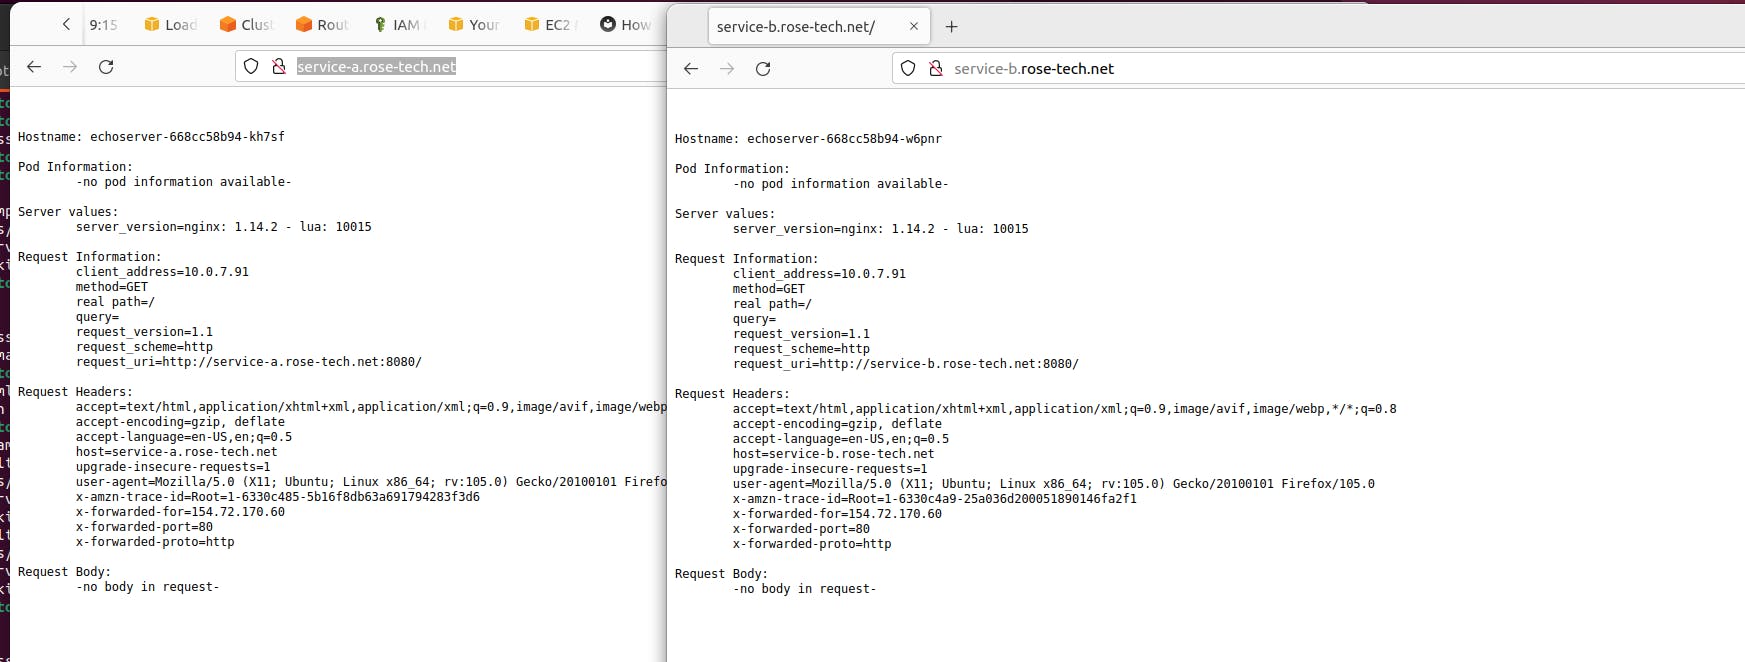
Alright, service a and service b both work. If you are building an internet-facing application or even a website, most likely, you would want to secure it with a TLS certificate.
3 - Secure Ingress with SSL/TLS (3-secured-ingress-example)
I'll secure ingress with TLS using amazon resource name annotation and auto-discovery mechanism. Dedicated namespace. Same deployment, Same service. And finally, ingress resource. To bind ingress with a certificate, we can use certificate-arn annotation. Before we can continue, we need to issue a certificate. Go to AWS Certificate Manager. And click request a new certificate. Keep request as public certificate.
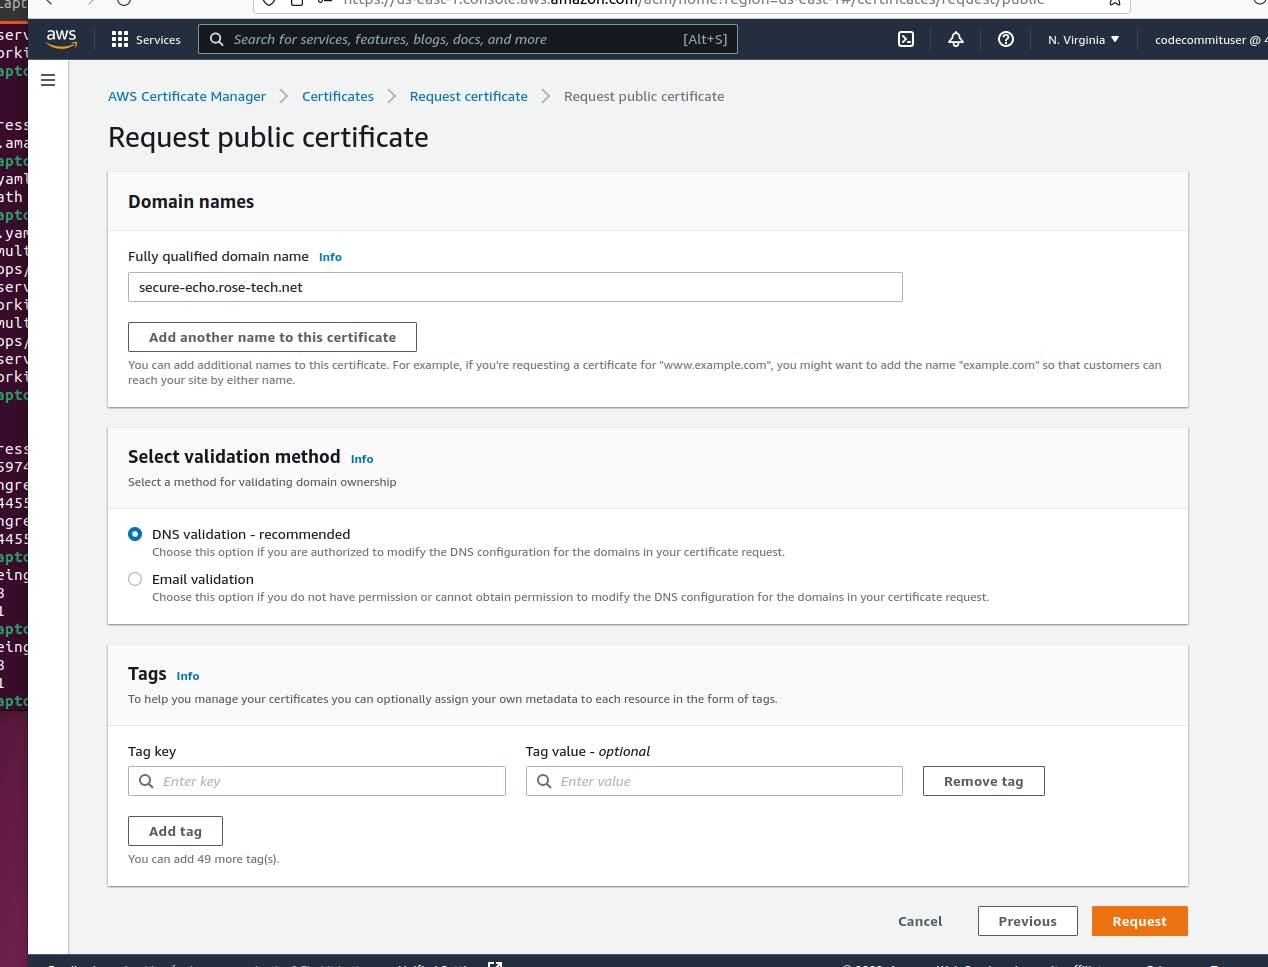
And paste a fully qualified domain name. It should match the ingress host.
Then we need to validate that we own this domain. You can either select email or dns validation which is way faster.
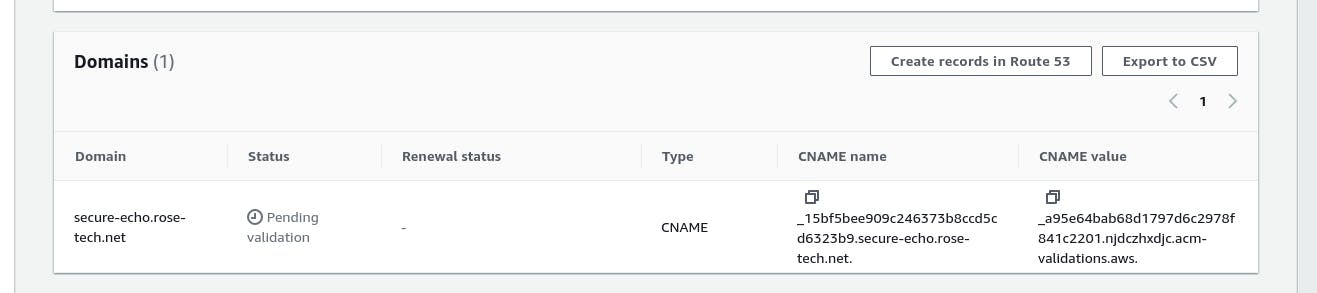
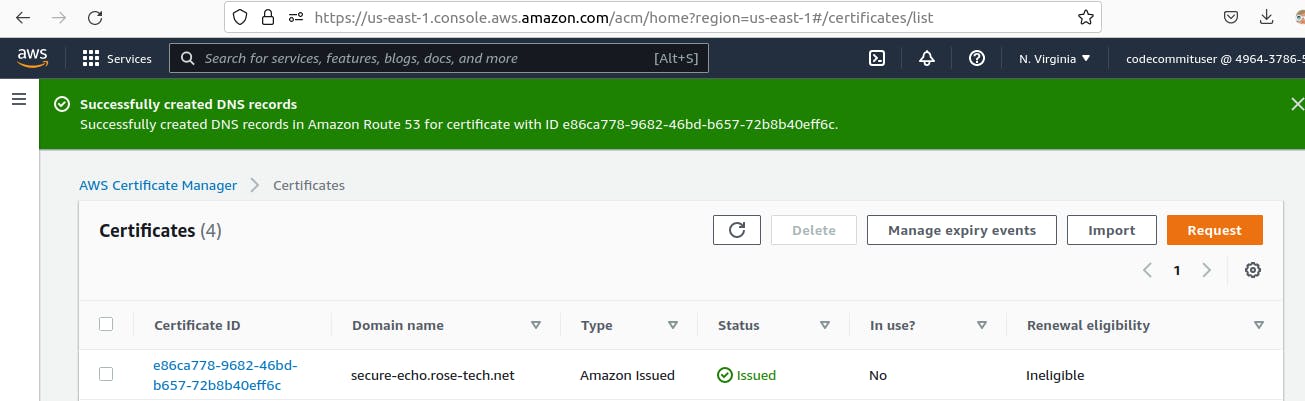
Automatically create a CNAME record to verify ownership. Shortly after you create a DNS record, your certificate should be issued by AWS.
The status has changed from pending to issued. Now go back to the certificate and copy ARN.
For this ingress, I also want to redirect all the requests that come to port 80 to 443. This is a very common requirement not simply to refuse connection but to redirect to the secure port. Then specify where you want to redirect, standard HTTPS port 443.
---
apiVersion: v1
kind: Namespace
metadata:
  name: 3-secured-ingress-example
---
apiVersion: apps/v1
kind: Deployment
metadata:
  name: echoserver
  namespace: 3-secured-ingress-example
spec:
  selector:
    matchLabels:
      app: echoserver
  replicas: 1
  template:
    metadata:
      labels:
        app: echoserver
    spec:
      containers:
        - image: k8s.gcr.io/e2e-test-images/echoserver:2.5
          name: echoserver
          ports:
            - containerPort: 8080
---
apiVersion: v1
kind: Service
metadata:
  name: echoserver
  namespace: 3-secured-ingress-example
spec:
  ports:
    - port: 80
      targetPort: 8080
      protocol: TCP
  type: NodePort
  selector:
    app: echoserver
---
apiVersion: networking.k8s.io/v1
kind: Ingress
metadata:
  name: echoserver
  namespace: 3-secured-ingress-example
  annotations:
    alb.ingress.kubernetes.io/certificate-arn: arn:aws:acm:us-east-1:496437865731:certificate/e86ca778-9682-46bd-b657-72b8b40eff6c
    alb.ingress.kubernetes.io/listen-ports: '[{"HTTP": 80}, {"HTTPS":443}]'
    alb.ingress.kubernetes.io/ssl-redirect: '443'
    alb.ingress.kubernetes.io/scheme: internet-facing
spec:
  ingressClassName: alb
  rules:
    - host: secure-echo.rose-tech.net
      http:
        paths:
          - path: /
            pathType: Exact
            backend:
              service:
                name: echoserver
                port:
                  number: 80
---
apiVersion: networking.k8s.io/v1
kind: Ingress
metadata:
  name: echoserver-v2
  namespace: 3-secured-ingress-example
  annotations:
    alb.ingress.kubernetes.io/listen-ports: '[{"HTTPS":443}]'
    alb.ingress.kubernetes.io/scheme: internet-facing
spec:
  ingressClassName: alb
  rules:
    - host: secure-echo-v2.rose-tech.net
      http:
        paths:
          - path: /
            pathType: Exact
            backend:
              service:
                name: echoserver
                port:
                  number: 80
Don't forget to specify the scheme; otherwise, by default, it will create a private load balancer.
Let's go ahead and apply.
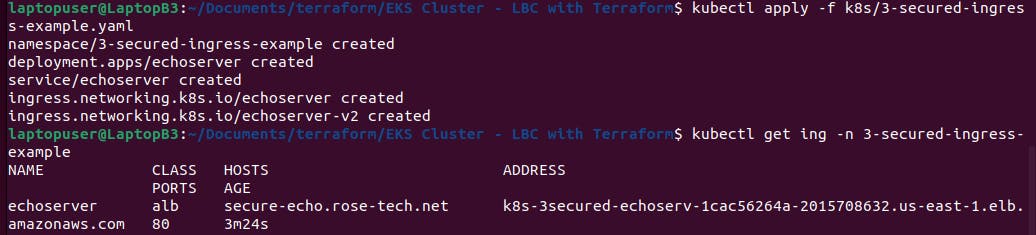
kubectl apply -f k8s/3-secured-ingress-example.yaml
As always, to be able to use it we need to create a CNAME record.
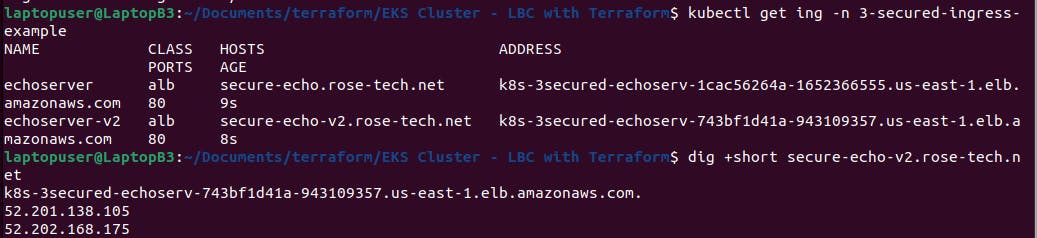
kubectl get ing -n 3-secured-ingress-example
In AWS, you can find our application load balancer. We have two listeners, on port 80 and port 443. Also, based on your requirements, you can update the security policy on the load balancer with ssl-policy annotation.
Let’s test HTTPS. You can see a lock means the endpoint is secure.
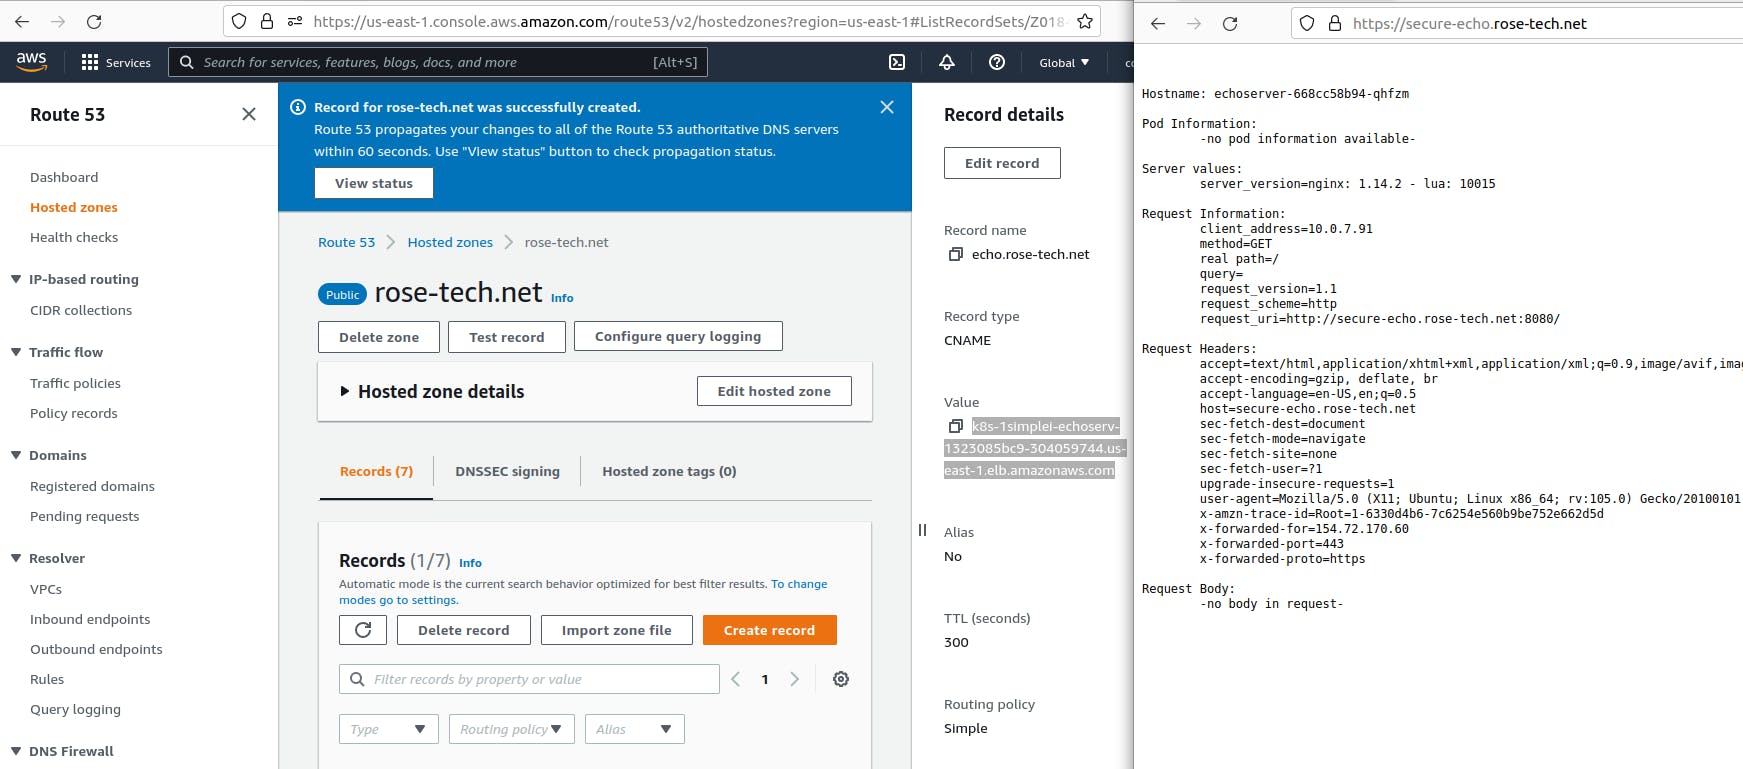
Redirect also works as well.
In the first ingress, we explicitly specified the ARN of the certificate. But you can also rely on autodiscovery when you omit certificate-arn annotation. You just need to specify HTTPS 443 annotation. Discovery will search the host from the ingress in the AWS certificate manager. When it finds the match or wildcard certificate, it will attach it to the load balancer. If you use nginx ingress, you know that TLS termination is happening on the controller level inside the Kubernetes. With aws load balancer controller, tls termination occurs on load balancer level instead. Before we can test it, we also need to create a certificate. It is exactly the same process.
Select the public certificate and validate it by creating the CNAME records. Here it is important to make sure that the certificate is issued before creating ingress. Wait till status transitions to issued.
Last cname for ingress secure-echo-v2. This ingress points to a different load balancer since they are not part of the same ingress group.
It works. You can check the certificate from the browser. The certificate is valid.
There is a way how you can automate this task with external-dns. The way it works, you deploy an external-dns controller into Kubernetes, give it the necessary permissions to list and create DNS records, and it automatically watches the ingress resources created in the cluster. When it sees the new ingress, it will take the dns from the host key and create the Route53 ALIAS record.
The process to grant permissions is similar to aws-load-balancer-controller.
first, we need to create an IAM policy for the external-dns controller. This policy grants access to all hosted zones in Route53, but I would suggest you restrict access to a specific hosted zone by providing hosted zone id. The second statement is to list zones and records give it the name ExternalDNSAccess. Then we need to create an IAM role for the service account. Similar to the aws load balancer controller, it will be web identity type and use the same open id connect provider. Finally, attach the ExternalDNSAccess policy to this role. Use the same name,
external-dns, for the role. And don’t forget to update the trust relationship as well.
We’re going to deploy external-dns to the kube-system namespace.
---
apiVersion: v1
kind: ServiceAccount
metadata:
  name: external-dns
  namespace: kube-system
  annotations:
    eks.amazonaws.com/role-arn: arn:aws:iam::496437865731:role/external-dns
---
apiVersion: rbac.authorization.k8s.io/v1
kind: ClusterRole
metadata:
  name: external-dns
rules:
  - apiGroups: ['']
    resources: ['services', 'endpoints', 'pods']
    verbs: ['get', 'watch', 'list']
  - apiGroups: ['extensions', 'networking.k8s.io']
    resources: ['ingresses']
    verbs: ['get', 'watch', 'list']
  - apiGroups: ['']
    resources: ['nodes']
    verbs: ['list', 'watch']
---
apiVersion: rbac.authorization.k8s.io/v1
kind: ClusterRoleBinding
metadata:
  name: external-dns-viewer
roleRef:
  apiGroup: rbac.authorization.k8s.io
  kind: ClusterRole
  name: external-dns
subjects:
  - kind: ServiceAccount
    name: external-dns
    namespace: kube-system
---
apiVersion: apps/v1
kind: Deployment
metadata:
  name: external-dns
  namespace: kube-system
spec:
  strategy:
    type: Recreate
  selector:
    matchLabels:
      app: external-dns
  template:
    metadata:
      labels:
        app: external-dns
    spec:
      serviceAccountName: external-dns
      containers:
        - name: external-dns
          image: k8s.gcr.io/external-dns/external-dns:v0.12.0
          args:
            - --source=service
            - --source=ingress
            - --provider=aws
            - --policy=upsert-only
            - --aws-zone-type=public
            - --registry=txt
            - --txt-owner-id=eks-identifier
      securityContext:
        fsGroup: 65534
Next is Kubernetes deployment.
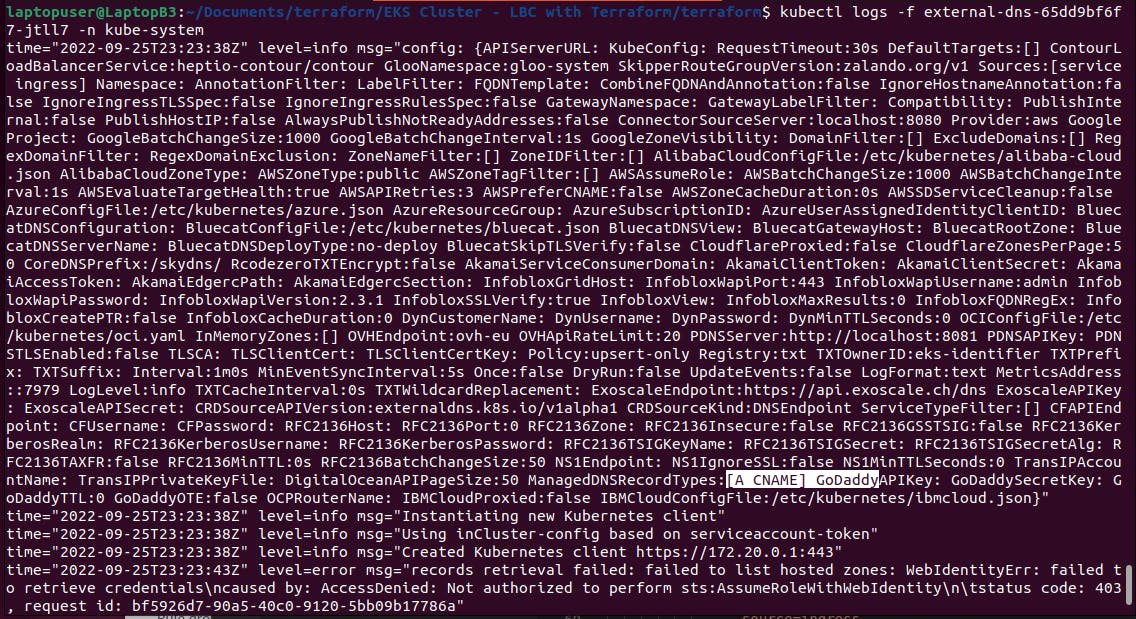
Then the cluster role, that will allow external-dns to watch for newly created ingresses and we need to bind it to the Kubernetes service account. You need to make sure that you’re using the same service account in the deployment. For example, a source equal to ingress will automate the creation of CNAME records from the ingress resource. Provider aws, then you can specify if you only want to add or update dns records, You can manage DNS for public, private, or both hosted zones. Also, registry txt and txt owner id will allow external-dns to keep track of what records are managed by the external-dns controller.
Let’s go ahead and deploy it. Make sure that the pod is up and running.
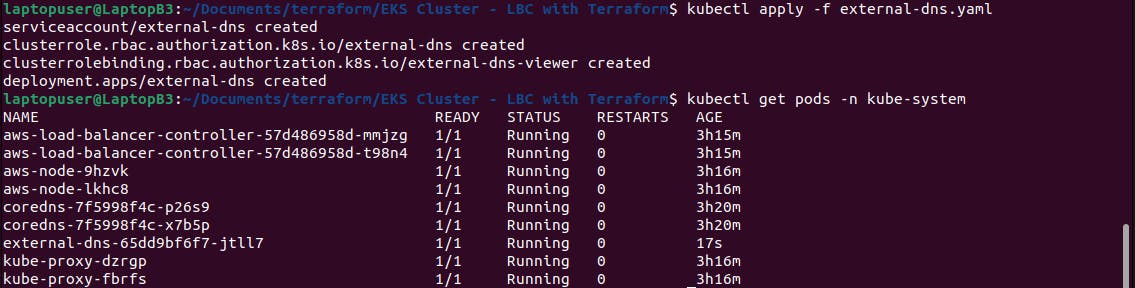
You should also check logs;
kubectl logs -f external-dns-65dd9bf6f7-jtll7 -n kube-system
Now let’s test it with ingress.
4 - Automatically create DNS for ingress (4-auto-dns-ingress-example)
Let’s place it in example 4 namespace. Same deployment as always.
But for the service, we will use clusterIP instead of node port. Aws load balancer controller has two modes: instance and ip. IP mode is more efficient since it removes additional network hop as an instance. For the ingress, let’s use the same internet-facing annotation to get public ip. And here, we switch from instance mode to ip mode. Now, this host api.rose-tech.net will be automatically created in the route53 zone.
---
apiVersion: v1
kind: Namespace
metadata:
  name: 4-auto-dns-ingress-example
---
apiVersion: apps/v1
kind: Deployment
metadata:
  name: echoserver
  namespace: 4-auto-dns-ingress-example
spec:
  selector:
    matchLabels:
      app: echoserver
  replicas: 1
  template:
    metadata:
      labels:
        app: echoserver
    spec:
      containers:
        - image: k8s.gcr.io/e2e-test-images/echoserver:2.5
          name: echoserver
          ports:
            - containerPort: 8080
---
apiVersion: v1
kind: Service
metadata:
  name: echoserver
  namespace: 4-auto-dns-ingress-example
spec:
  ports:
    - port: 8080
      protocol: TCP
  type: ClusterIP
  selector:
    app: echoserver
---
apiVersion: networking.k8s.io/v1
kind: Ingress
metadata:
  name: echoserver
  namespace: 4-auto-dns-ingress-example
  annotations:
    alb.ingress.kubernetes.io/scheme: internet-facing
    alb.ingress.kubernetes.io/target-type: ip
spec:
  ingressClassName: alb
  rules:
    - host: api.rose-tech.net
      http:
        paths:
          - path: /
            pathType: Exact
            backend:
              service:
                name: echoserver
                port:
                  number: 8080
Let’s apply this example.
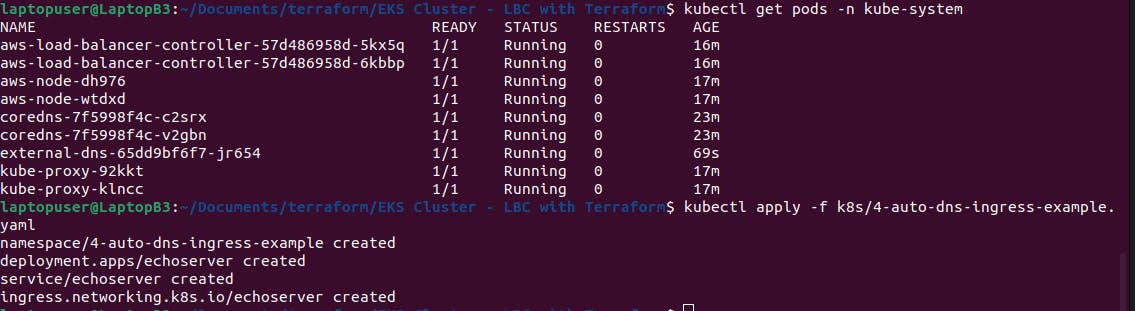
In a few seconds, you should be able to see in the logs of external-dns that it created a few records. In my case, it’s 3 records in rose-tech.net hosted zone. You can also see them in aws console.
You may notice that it’s an A record instead of CNAME, which allows resolving dns directly to
ip. It’s done via alias record and pointing to the load balancer hostname.
Looks like dns is ready, and we can try to use curl to reach our service in the Kubernetes cluster.
Alright, it works.
5 Create Service of Type LoadBalancer
(5-service-type-load-balancer-example)
Aws load balancer controller can not only create application load balancers for ingresses but is also capable of managing a typical Kubetnes service of a type load balancer. For the Kubernetes service, controller creates a network load balancer that acts on layer 4 of the OSI model.
That's going to be an 5-service-type-load-balancer-example The service resources of type LoadBalancer also get reconciled by the Kubernetes controller built into the cloudprovider component. Also called in-tree controller. The AWS in-tree controller ignores those services resources that have the aws-load-balancer-type annotation as external. Let’s also use ip mode for the load balancer. And expose it to the internet.
---
apiVersion: v1
kind: Namespace
metadata:
  name: 5-service-type-load-balancer-example
---
apiVersion: apps/v1
kind: Deployment
metadata:
  name: echoserver
  namespace: 5-service-type-load-balancer-example
spec:
  selector:
    matchLabels:
      app: echoserver
  replicas: 1
  template:
    metadata:
      labels:
        app: echoserver
    spec:
      containers:
        - image: k8s.gcr.io/e2e-test-images/echoserver:2.5
          name: echoserver
          ports:
            - containerPort: 8080
---
apiVersion: v1
kind: Service
metadata:
  name: echoserver
  namespace: 5-service-type-load-balancer-example
  annotations:
    service.beta.kubernetes.io/aws-load-balancer-type: external
    service.beta.kubernetes.io/aws-load-balancer-nlb-target-type: ip
    service.beta.kubernetes.io/aws-load-balancer-scheme: internet-facing
    # service.beta.kubernetes.io/aws-load-balancer-proxy-protocol: "*"
spec:
  ports:
    - port: 8080
      protocol: TCP
  type: LoadBalancer
  selector:
    app: echoserver
You can optionally enable proxy protocol v2; this protocol adds the source ip address to the header of the request. Let’s apply it.
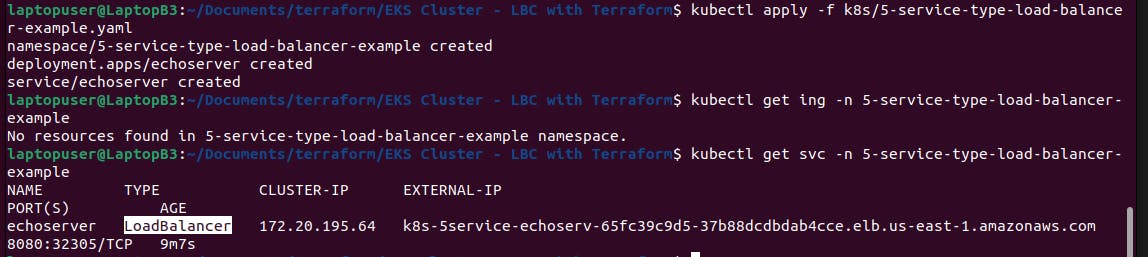
kubectl apply -f k8s/5-service-type-load-balancer-example.yaml


kubectl get svc -n 5-service-type-load-balancer-example
We already have the load balancer dns name.
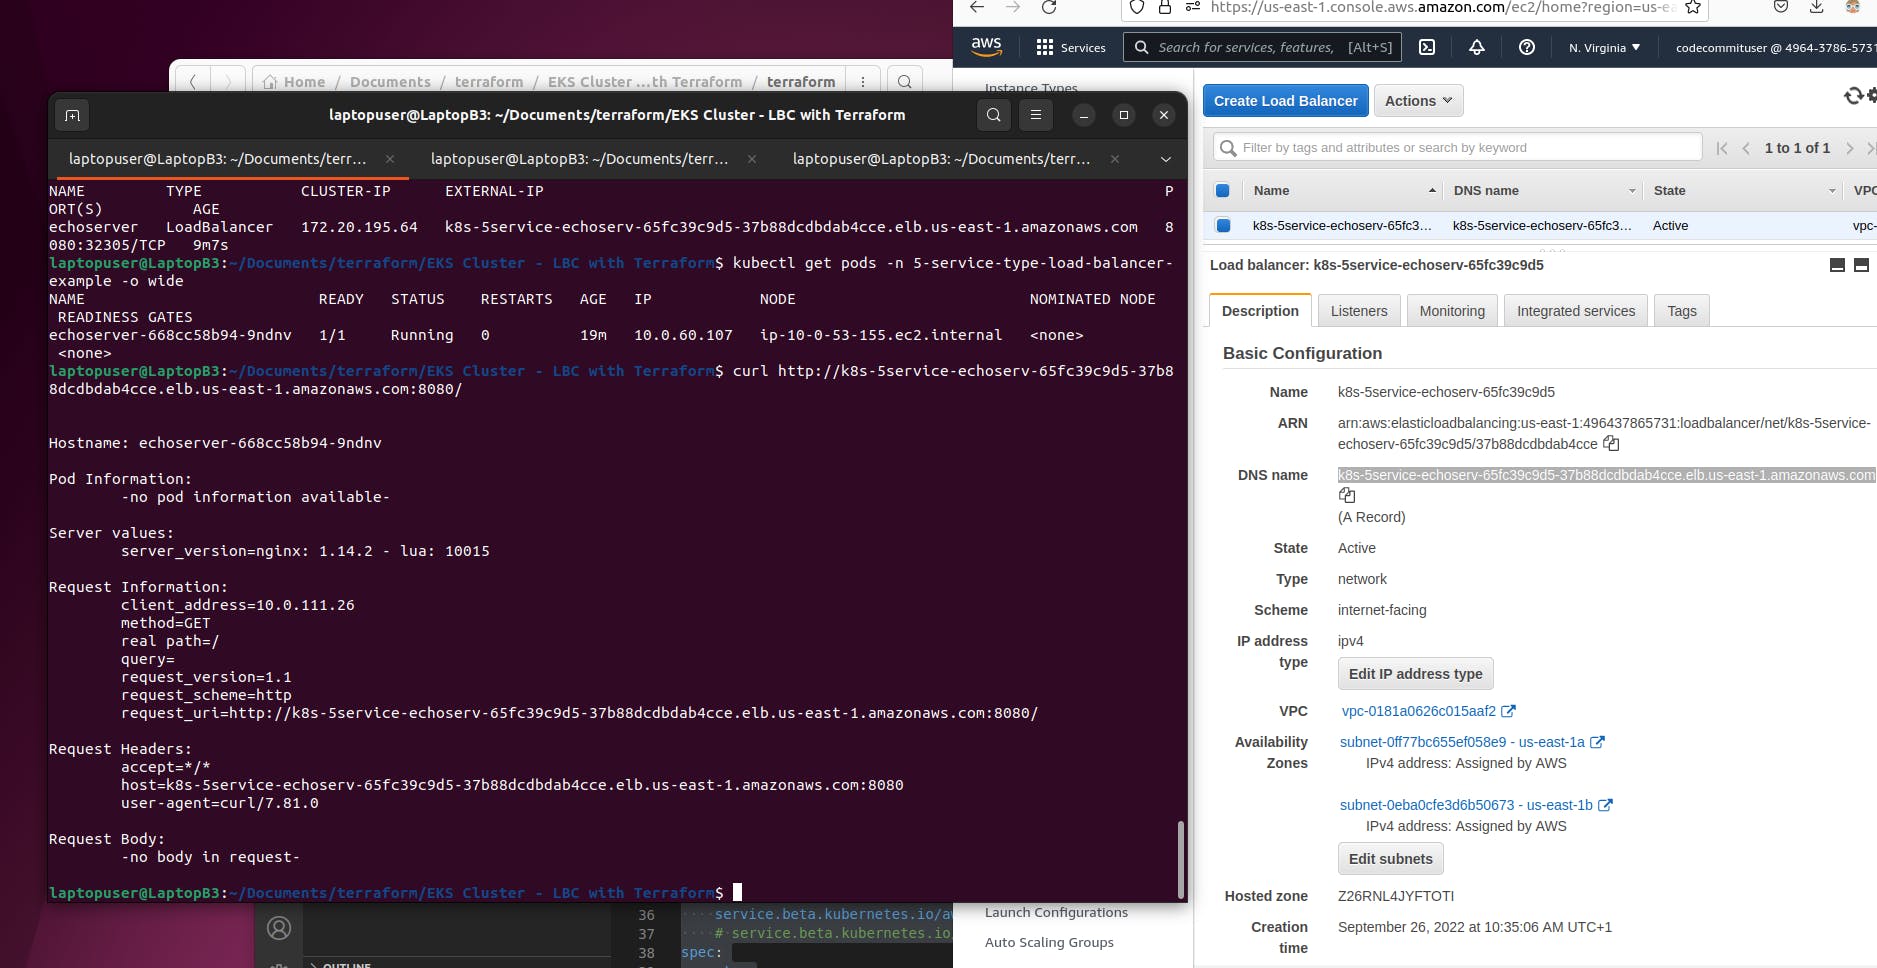
You can get the pods with a wide flag to get pod ip.
kubectl get pods -n 5-service-type-load-balancer-example -o wide
This ip address will be used in the target group of the load balancer. You can find the load balancer in the console. Type is a network and not an application. Also, it is internet facing. Under the listener, you can find the target group. We have the same ip address here.
You just need to wait a little bit till the target shows up as healthy. Then...
curl http://k8s-5service-echoserv-65fc39c9d5-37b88dcdbdab4cce.elb.us-east-1.amazonaws.com:8080/
You can use curl and port 8080 to reach the service in Kubernetes.
Conclusion
The only issue that I found with AWS load balancer controller that concerns me is that it does not properly support path-based routing. For example, currently, it's impossible to use URL rewrite. In that case you would need to fall back to nginx ingress.