

Table of contents


No headings in the article.
Hello readers, in today's article we are going to provision a kubenetes cluster on AWS using terraform.
Create AWS VPC using Terraform
Let's start with terraform. First, we need to create an AWS provider. It allows to interact with the many resources supported by AWS, such as VPC, EC2, EKS, and many others. You must configure the provider with the proper credentials before using it. The most common authentications methods:
- AWS shared credentials/configuration files
- Environment variables
- Static credentials
- EC2 instance metadata
So let give it a name terraform/0-provider.tf.
provider "aws" {
  region = "us-east-1"
}

terraform {
  required_providers {
    aws = {
      source  = "hashicorp/aws"
      version = "~> 4.23.0"
    }
  }

  required_version = "~> 1.0"
}
The next step is to create a virtual private cloud in AWS using the aws_vpc resource. There is one required field that you need to provide, which is the size of your network. 10.0.0.0/16 will give you approximately 65 thousand IP addresses. For your convenience, you can also give it a tag, for example, main. Let's name it terraform/1-vpc.tf.
resource "aws_vpc" "main" {
  cidr_block = "10.0.0.0/16"

  tags = {
    Name = "main"
  }
}
Create Internet Gateway AWS using Terraform To provide internet access for your services, we need to have an internet gateway in our VPC. You need to attach it to the VPC that we just created. It will be used as a default route in public subnets. Give it a name terraform/2-igw.tf.
resource "aws_internet_gateway" "igw" {
  vpc_id = aws_vpc.main.id

  tags = {
    Name = "igw"
  }
}
Create private and public subnets in AWS using Terraform Now, we need to create four subnets. To meet NLB requirements, we need to have two public and two private subnets in different availability zones. File name is terraform/3-subnets.tf
resource "aws_subnet" "private-us-east-1a" {
  vpc_id            = aws_vpc.main.id
  cidr_block        = "10.0.0.0/19"
  availability_zone = "us-east-1a"

  tags = {
    "Name"                            = "private-us-east-1a"
    "kubernetes.io/role/internal-elb" = "1"
    "kubernetes.io/cluster/demo"      = "owned"
  }
}

resource "aws_subnet" "private-us-east-1b" {
  vpc_id            = aws_vpc.main.id
  cidr_block        = "10.0.32.0/19"
  availability_zone = "us-east-1b"

  tags = {
    "Name"                            = "private-us-east-1b"
    "kubernetes.io/role/internal-elb" = "1"
    "kubernetes.io/cluster/demo"      = "owned"
  }
}

resource "aws_subnet" "public-us-east-1a" {
  vpc_id                  = aws_vpc.main.id
  cidr_block              = "10.0.64.0/19"
  availability_zone       = "us-east-1a"
  map_public_ip_on_launch = true

  tags = {
    "Name"                       = "public-us-east-1a"
    "kubernetes.io/role/elb"     = "1"
    "kubernetes.io/cluster/demo" = "owned"
  }
}

resource "aws_subnet" "public-us-east-1b" {
  vpc_id                  = aws_vpc.main.id
  cidr_block              = "10.0.96.0/19"
  availability_zone       = "us-east-1b"
  map_public_ip_on_launch = true

  tags = {
    "Name"                       = "public-us-east-1b"
    "kubernetes.io/role/elb"     = "1"
    "kubernetes.io/cluster/demo" = "owned"
  }
}
Create NAT Gateway in AWS using Terraform It's time to create a NAT gateway. It is used in private subnets to allow services to connect to the internet. For NAT, we need to allocate public IP address first. Then we can use it in the aws_nat_gateway resource. The important part here, you need to place it in the public subnet. That subnet must have an internet gateway as a default route. Give it a name terraform/4-nat.tf.
resource "aws_eip" "nat" {
  vpc = true

  tags = {
    Name = "nat"
  }
}

resource "aws_nat_gateway" "nat" {
  allocation_id = aws_eip.nat.id
  subnet_id     = aws_subnet.public-us-east-1a.id

  tags = {
    Name = "nat"
  }

  depends_on = [aws_internet_gateway.igw]
}
By now, we have created subnets, internet gateway, and nat gateway. It's time to create routing tables and associate subnets with them. File name is terraform/5-routes.tf.
resource "aws_route_table" "private" {
  vpc_id = aws_vpc.main.id

  route = [
    {
      cidr_block                 = "0.0.0.0/0"
      nat_gateway_id             = aws_nat_gateway.nat.id
      carrier_gateway_id         = ""
      destination_prefix_list_id = ""
      egress_only_gateway_id     = ""
      gateway_id                 = ""
      instance_id                = ""
      ipv6_cidr_block            = ""
      local_gateway_id           = ""
      network_interface_id       = ""
      transit_gateway_id         = ""
      vpc_endpoint_id            = ""
      vpc_peering_connection_id  = ""
    },
  ]

  tags = {
    Name = "private"
  }
}

resource "aws_route_table" "public" {
  vpc_id = aws_vpc.main.id

  route = [
    {
      cidr_block                 = "0.0.0.0/0"
      gateway_id                 = aws_internet_gateway.igw.id
      nat_gateway_id             = ""
      carrier_gateway_id         = ""
      destination_prefix_list_id = ""
      egress_only_gateway_id     = ""
      instance_id                = ""
      ipv6_cidr_block            = ""
      local_gateway_id           = ""
      network_interface_id       = ""
      transit_gateway_id         = ""
      vpc_endpoint_id            = ""
      vpc_peering_connection_id  = ""
    },
  ]

  tags = {
    Name = "public"
  }
}

resource "aws_route_table_association" "private-us-east-1a" {
  subnet_id      = aws_subnet.private-us-east-1a.id
  route_table_id = aws_route_table.private.id
}

resource "aws_route_table_association" "private-us-east-1b" {
  subnet_id      = aws_subnet.private-us-east-1b.id
  route_table_id = aws_route_table.private.id
}

resource "aws_route_table_association" "public-us-east-1a" {
  subnet_id      = aws_subnet.public-us-east-1a.id
  route_table_id = aws_route_table.public.id
}

resource "aws_route_table_association" "public-us-east-1b" {
  subnet_id      = aws_subnet.public-us-east-1b.id
  route_table_id = aws_route_table.public.id
}
Create EKS cluster using Terraform
Finally, we got to the EKS cluster. Kubernetes clusters managed by Amazon EKS make calls to other AWS services on your behalf to manage the resources that you use with the service. For example, EKS will create an autoscaling group for each instance group if you use managed nodes. Before you can create Amazon EKS clusters, you must create an IAM role with the AmazonEKSClusterPolicy. Let's name it terraform/6-eks.tf.
resource "aws_iam_role" "demo" {
  name = "eks-cluster-demo"

  assume_role_policy = <<POLICY
{
  "Version": "2012-10-17",
  "Statement": [
    {
      "Effect": "Allow",
      "Principal": {
        "Service": "eks.amazonaws.com"
      },
      "Action": "sts:AssumeRole"
    }
  ]
}
POLICY
}

resource "aws_iam_role_policy_attachment" "demo-AmazonEKSClusterPolicy" {
  policy_arn = "arn:aws:iam::aws:policy/AmazonEKSClusterPolicy"
  role       = aws_iam_role.demo.name
}

resource "aws_eks_cluster" "demo" {
  name     = "demo"
  role_arn = aws_iam_role.demo.arn

  vpc_config {
    subnet_ids = [
      aws_subnet.private-us-east-1a.id,
      aws_subnet.private-us-east-1b.id,
      aws_subnet.public-us-east-1a.id,
      aws_subnet.public-us-east-1b.id
    ]
  }

  depends_on = [aws_iam_role_policy_attachment.demo-AmazonEKSClusterPolicy]
}
Next, we are going to create a single instance group for Kubernetes. Similar to the EKS cluster, it requires an IAM role as well.
resource "aws_iam_role" "nodes" {
  name = "eks-node-group-nodes"

  assume_role_policy = jsonencode({
    Statement = [{
      Action = "sts:AssumeRole"
      Effect = "Allow"
      Principal = {
        Service = "ec2.amazonaws.com"
      }
    }]
    Version = "2012-10-17"
  })
}

resource "aws_iam_role_policy_attachment" "nodes-AmazonEKSWorkerNodePolicy" {
  policy_arn = "arn:aws:iam::aws:policy/AmazonEKSWorkerNodePolicy"
  role       = aws_iam_role.nodes.name
}

resource "aws_iam_role_policy_attachment" "nodes-AmazonEKS_CNI_Policy" {
  policy_arn = "arn:aws:iam::aws:policy/AmazonEKS_CNI_Policy"
  role       = aws_iam_role.nodes.name
}

resource "aws_iam_role_policy_attachment" "nodes-AmazonEC2ContainerRegistryReadOnly" {
  policy_arn = "arn:aws:iam::aws:policy/AmazonEC2ContainerRegistryReadOnly"
  role       = aws_iam_role.nodes.name
}

resource "aws_eks_node_group" "private-nodes" {
  cluster_name    = aws_eks_cluster.demo.name
  node_group_name = "private-nodes"
  node_role_arn   = aws_iam_role.nodes.arn

  subnet_ids = [
    aws_subnet.private-us-east-1a.id,
    aws_subnet.private-us-east-1b.id
  ]

  capacity_type  = "ON_DEMAND"
  instance_types = ["t3.small"]

  scaling_config {
    desired_size = 1
    max_size     = 5
    min_size     = 0
  }

  update_config {
    max_unavailable = 1
  }

  labels = {
    role = "general"
  }

  # taint {
  #   key    = "team"
  #   value  = "devops"
  #   effect = "NO_SCHEDULE"
  # }

  # launch_template {
  #   name    = aws_launch_template.eks-with-disks.name
  #   version = aws_launch_template.eks-with-disks.latest_version
  # }

  depends_on = [
    aws_iam_role_policy_attachment.nodes-AmazonEKSWorkerNodePolicy,
    aws_iam_role_policy_attachment.nodes-AmazonEKS_CNI_Policy,
    aws_iam_role_policy_attachment.nodes-AmazonEC2ContainerRegistryReadOnly,
  ]
}

# resource "aws_launch_template" "eks-with-disks" {
#   name = "eks-with-disks"

#   key_name = "local-provisioner"

#   block_device_mappings {
#     device_name = "/dev/xvdb"

#     ebs {
#       volume_size = 50
#       volume_type = "gp2"
#     }
#   }
# }
Create IAM OIDC provider EKS using Terraform
To manage permissions for your applications that you deploy in Kubernetes. You can either attach policies to Kubernetes nodes directly. In that case, every pod will get the same access to AWS resources. Or you can create OpenID connect provider, which will allow granting IAM permissions based on the service account used by the pod. File name is terraform/8-iam-oidc.tf.
data "tls_certificate" "eks" {
  url = aws_eks_cluster.demo.identity[0].oidc[0].issuer
}

resource "aws_iam_openid_connect_provider" "eks" {
  client_id_list  = ["sts.amazonaws.com"]
  thumbprint_list = [data.tls_certificate.eks.certificates[0].sha1_fingerprint]
  url             = aws_eks_cluster.demo.identity[0].oidc[0].issuer
}
I highly recommend testing the provider first before deploying the autoscaller. It can save you a lot of time. File name is terraform/9-iam-test.tf.
data "aws_iam_policy_document" "test_oidc_assume_role_policy" {
  statement {
    actions = ["sts:AssumeRoleWithWebIdentity"]
    effect  = "Allow"

    condition {
      test     = "StringEquals"
      variable = "${replace(aws_iam_openid_connect_provider.eks.url, "https://", "")}:sub"
      values   = ["system:serviceaccount:default:aws-test"]
    }

    principals {
      identifiers = [aws_iam_openid_connect_provider.eks.arn]
      type        = "Federated"
    }
  }
}

resource "aws_iam_role" "test_oidc" {
  assume_role_policy = data.aws_iam_policy_document.test_oidc_assume_role_policy.json
  name               = "test-oidc"
}

resource "aws_iam_policy" "test-policy" {
  name = "test-policy"

  policy = jsonencode({
    Statement = [{
      Action = [
        "s3:ListAllMyBuckets",
        "s3:GetBucketLocation"
      ]
      Effect   = "Allow"
      Resource = "arn:aws:s3:::*"
    }]
    Version = "2012-10-17"
  })
}

resource "aws_iam_role_policy_attachment" "test_attach" {
  role       = aws_iam_role.test_oidc.name
  policy_arn = aws_iam_policy.test-policy.arn
}

output "test_policy_arn" {
  value = aws_iam_role.test_oidc.arn
}
Now we can run terraform.
terraform apply
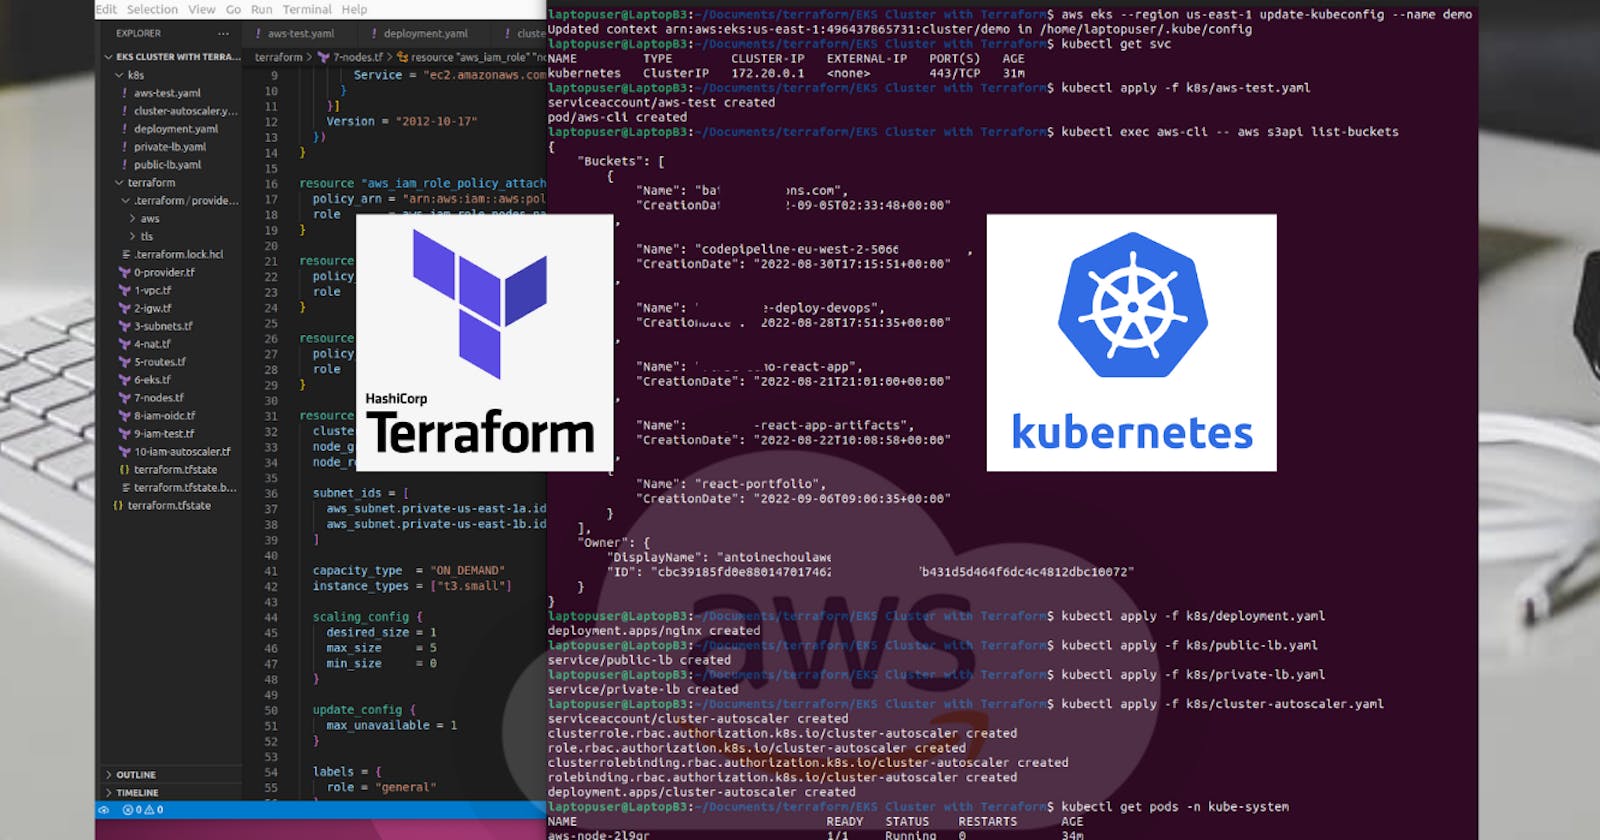
To export Kubernetes context you can use aws eks ... command; just replace region and name of the cluster.
aws eks --region us-east-1 update-kubeconfig --name demo
To check connection to EKS cluster run the following command:
kubectl get svc
Next is to create a pod to test IAM roles for service accounts. First, we are going to omit annotations to bind the service account with the role. The way it works, you create a service account and use it in your pod spec. It can be anything, deployment, statefulset, or some jobs. Give it a name k8s/aws-test.yaml.
aws-test.yaml
---
apiVersion: v1
kind: ServiceAccount
metadata:
  name: aws-test
  namespace: default
---
apiVersion: v1
kind: Pod
metadata:
  name: aws-cli
  namespace: default
spec:
  serviceAccountName: aws-test
  containers:
  - name: aws-cli
    image: amazon/aws-cli
    command: [ "/bin/bash", "-c", "--" ]
    args: [ "while true; do sleep 30; done;" ]
  tolerations:
  - operator: Exists
    effect: NoSchedule
Then you need to apply it using kubectl apply -f command.
kubectl apply -f k8s/aws-test.yaml
Now, let's check if can list S3 buckets in our account.
kubectl exec aws-cli -- aws s3api list-buckets
Let's add missing annotation to the service account and redeploy the pod. Don't forget to replace 424432388155 with your AWS account number.
aws-test.yaml
---
...
  annotations:
    eks.amazonaws.com/role-arn: arn:aws:iam::424432388155:role/test-oidc
...
kubectl delete -f k8s/aws-test.yaml
kubectl apply -f k8s/aws-test.yaml
Try to list buckets again.
kubectl exec aws-cli -- aws s3api list-buckets
Create public load balancer on EKS
Next, let's deploy the sample application and expose it using public and private load balancers. The first is a deployment object with a base nginx image. File name is k8s/deployment.yaml.
deployment.yaml
---
apiVersion: apps/v1
kind: Deployment
metadata:
  name: nginx
spec:
  replicas: 1
  selector:
    matchLabels:
      app: nginx
  template:
    metadata:
      labels:
        app: nginx
    spec:
      containers:
      - name: nginx
        image: nginx:1.14.2
        ports:
        - name: web
          containerPort: 80
        resources:
          requests:
            memory: 256Mi
            cpu: 250m
          limits:
            memory: 256Mi
            cpu: 250m
      affinity:
        nodeAffinity:
          requiredDuringSchedulingIgnoredDuringExecution:
            nodeSelectorTerms:
            - matchExpressions:
              - key: role
                operator: In
                values:
                - general
      # tolerations:
      # - key: team
      #   operator: Equal
      #   value: devops
      #   effect: NoSchedule
To expose the application to the internet, you can create a Kubernetes service of a type load balancer and use annotations to configure load balancer properties. By default, Kubernetes will create a load balancer in public subnets, so you don't need to provide any additional configurations. Also, if you want a new network load balancer instead of the old classic load balancer, you can add aws-load-balancer-type equal to nlb. Call it k8s/public-lb.yaml.
public-lb.yaml
---
apiVersion: v1
kind: Service
metadata:
  name: public-lb
  annotations:
    service.beta.kubernetes.io/aws-load-balancer-type: nlb
spec:
  type: LoadBalancer
  selector:
    app: nginx
  ports:
    - protocol: TCP
      port: 80
      targetPort: web
Create both deployment and the service objects.
kubectl apply -f k8s/deployment.yaml
kubectl apply -f k8s/public-lb.yaml
Find load balancer in AWS console by name. Verify that LB was created in public subnets
Create private load balancer on EKS
Sometimes if you have a large infrastructure with many different services, you have a requirement to expose the application only within your VPC. For that, you can create a private load balancer. To make it private, you need additional annotation: aws-load-balancer-internal and then provide the CIDR range. Usually, you use 0.0.0.0/0 to allow any services within your VPC to access it. Give it a name k8s/private-lb.yaml.
private-lb.yaml
---
apiVersion: v1
kind: Service
metadata:
  name: private-lb
  annotations:
    service.beta.kubernetes.io/aws-load-balancer-type: nlb
    service.beta.kubernetes.io/aws-load-balancer-internal: 0.0.0.0/0
spec:
  type: LoadBalancer
  selector:
    app: nginx
  ports:
    - protocol: TCP
      port: 80
      targetPort: web
Let's go back to the terminal and apply it. You can grab the load balancer name and find it in the AWS console as well.
kubectl apply -f k8s/private-lb.yaml
Find load balancer in AWS console by name. Verify that LB was created in private subnets
Deploy EKS cluster autoscaler
Finally, we got to the EKS autoscaller. We will be using OpenID connect provider to create an IAM role and bind it with the autoscaller. Let's create an IAM policy and role first. It's similar to the previous one, but autoscaller will be deployed in the kube-system namespace. File name is terraform/10-iam-autoscaler.tf.
data "aws_iam_policy_document" "eks_cluster_autoscaler_assume_role_policy" {
  statement {
    actions = ["sts:AssumeRoleWithWebIdentity"]
    effect  = "Allow"

    condition {
      test     = "StringEquals"
      variable = "${replace(aws_iam_openid_connect_provider.eks.url, "https://", "")}:sub"
      values   = ["system:serviceaccount:kube-system:cluster-autoscaler"]
    }

    principals {
      identifiers = [aws_iam_openid_connect_provider.eks.arn]
      type        = "Federated"
    }
  }
}

resource "aws_iam_role" "eks_cluster_autoscaler" {
  assume_role_policy = data.aws_iam_policy_document.eks_cluster_autoscaler_assume_role_policy.json
  name               = "eks-cluster-autoscaler"
}

resource "aws_iam_policy" "eks_cluster_autoscaler" {
  name = "eks-cluster-autoscaler"

  policy = jsonencode({
    Statement = [{
      Action = [
                "autoscaling:DescribeAutoScalingGroups",
                "autoscaling:DescribeAutoScalingInstances",
                "autoscaling:DescribeLaunchConfigurations",
                "autoscaling:DescribeTags",
                "autoscaling:SetDesiredCapacity",
                "autoscaling:TerminateInstanceInAutoScalingGroup",
                "ec2:DescribeLaunchTemplateVersions"
            ]
      Effect   = "Allow"
      Resource = "*"
    }]
    Version = "2012-10-17"
  })
}

resource "aws_iam_role_policy_attachment" "eks_cluster_autoscaler_attach" {
  role       = aws_iam_role.eks_cluster_autoscaler.name
  policy_arn = aws_iam_policy.eks_cluster_autoscaler.arn
}

output "eks_cluster_autoscaler_arn" {
  value = aws_iam_role.eks_cluster_autoscaler.arn
}
Let's apply the terraform again to create those objects.
terraform apply
Let's create autoscaller itself. You can find the source code for autoscaller here.
Go back to the terminal and apply.
kubectl apply -f k8s/cluster-autoscaler.yaml
You can verify that the autoscaler pod is up and running with the following command.
kubectl get pods -n kube-system
It's a good practice to check logs for any errors.
kubectl logs -l app=cluster-autoscaler -n kube-system -f
EKS cluster auto scaling demo
Verify that AG (aws autoscaling group) has required tags:
- k8s.io/cluster-autoscaler : owned
- k8s.io/cluster-autoscaler/enabled : TRUE
Split the terminal screen. In the first window run:
watch -n 1 -t kubectl get pods
In the second window run:
watch -n 1 -t kubectl get nodes
Now, to trigger autoscaling, increase replica for nginx deployment.
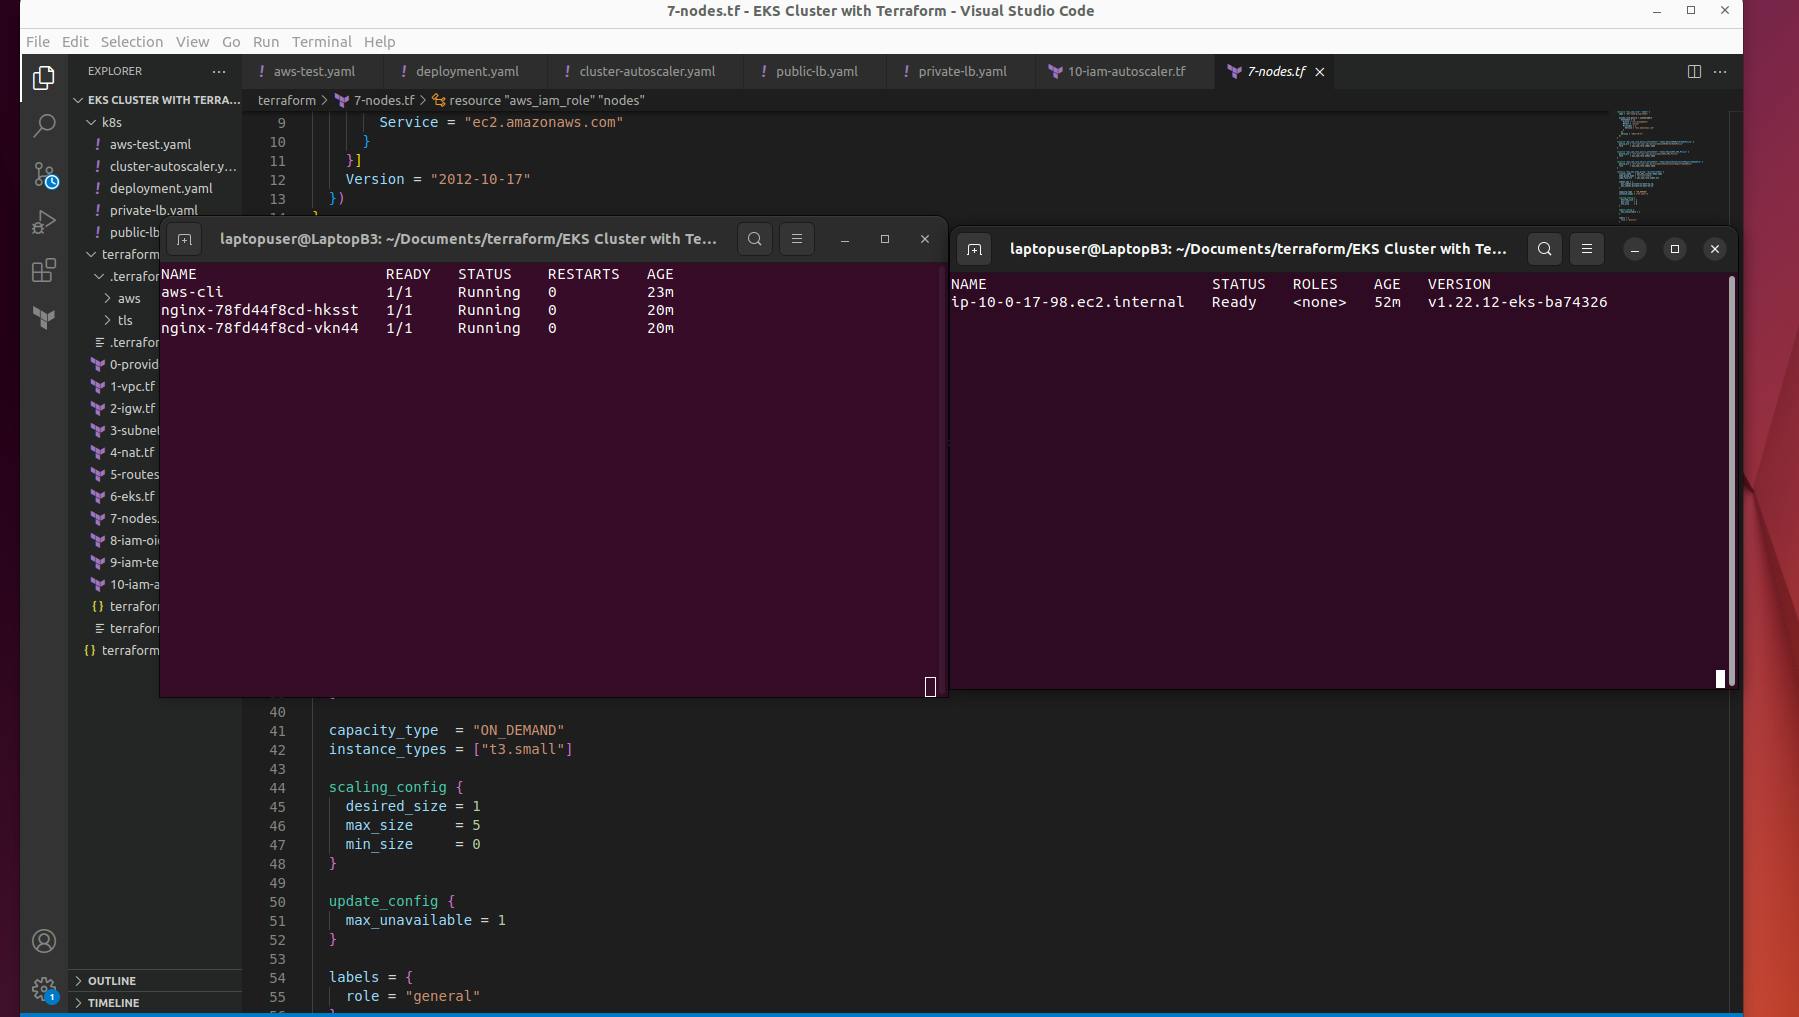
Modify the replica to 4 in deployment and see the difference.
kubectl apply -f k8s/deployment.yaml
You can also login to the console to observe these changes.
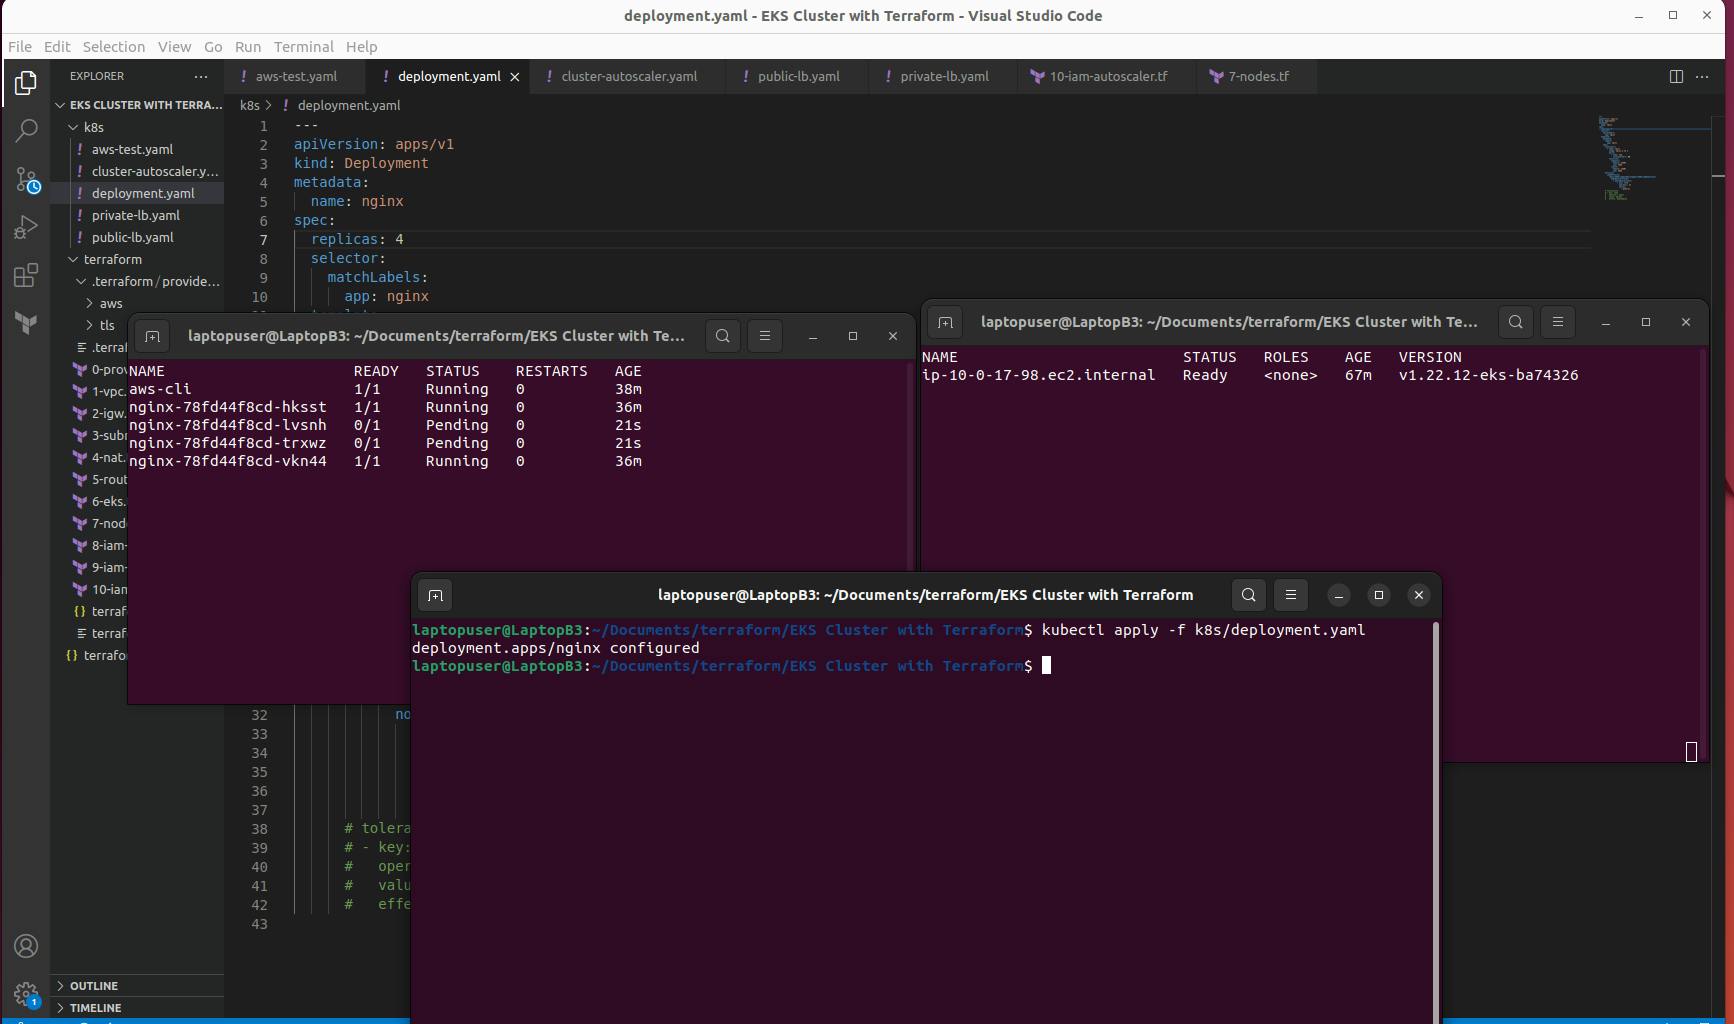
After some minute an additional node will be added and will run the pending pods.